Kukai, the Tezos Wallet. Step-by-step guide to Setup and Offline Signing.

Featured

Tags

In this post I’d like to tell you about some features of my currently preferred Tezos wallet – Kukai. I’ll tell you why I like it, and I’ll show you how to use Kukai’s unique Offline Signing feature.

Why Kukai?

Let’s start with why you might want to use this wallet. I like it for the following reasons:

Works Everywhere

Kukai provides native clients for Linux, Mac and Windows, and a web client that can be conveniently accessed from your browser from anywhere with an Internet connection.

Private Keys Never Leave Your Device

The private keys are stored in a local file on your computer (or in your browser’s local storage while you use the web client), but your keys are NEVER sent over the Internet. The local wallet file containing all the sensitive data is made easily accessible to you, so that you decide how you wish to manage the security of your private key. Furthermore, the sensitive data inside this file is encrypted with a password that hopefully exists only in your head.

Offline Signing

This is the most interesting and so far, unique feature in Kukai. Offline Signing is a really simple, but powerful idea that provides the highest level of security. If you set this up correctly, the security can be as good as a hardware wallet. The usage of this feature is optional, but very interesting and will be the focus of this guide.

Why Offline Signing?

It might be helpful to talk about why Offline Signing is something you might consider using.

The idea is simple – any Internet-connected computer is at risk of being hacked. Period. Even if your computer was perfectly secured, the user never can be ;).

So even though your private keys are never sent over the Internet by the wallet on purpose, attackers can still get them from you with any number of techniques. Here are just a couple of most common examples:

  • Link manipulation: The attacker might fool you into clicking on a malicious wallet link that is slightly different from the real link. It will take you to the attacker’s website, which will look exactly like your wallet. If you don’t notice this in time, you’ll end up typing your passwords and providing your wallet file to the attacker.
  • Virus: Your computer might be infected with a key logger virus, or a browser extension that records everything you type and steals specific files from your computer. Attackers will eventually get both, your wallet file and your password.


The ONLY sure way to be safe is to never store or access your private keys on an Internet-connected computer at all.

This is exactly where Kukai’s Offline Signing feature comes in. The idea is to use one computer to create and send transactions to the Tezos blockchain, and another separate, disconnected computer to sign these transactions with your private key.

Setting up this system is very easy, as long as you have another device to dedicate to this process.

Setup

Offline Signing will require 2 computers/devices – one connected to the Internet and one offline device, used exclusively for signing Tezos transactions. I’ll designate operations on the Internet-connected machine (aka “Workstation“), with green text, and operations on the signing machine (aka “Signer“), with red text.

It is completely up to you what kind of devices and operating systems you want to use on the Workstation and Signer. My personal preference for the Signer’s OS is Lubuntu (https://lubuntu.net/), because it is very quick and easy to install and configure.

If you do end up using a Linux distro on the Signer, please make sure you have this package installed while still connected to the Internet during your install:

$ apt-get install libgconf2-4

This library is required to run Kukai’s native Linux client.

After you are done performing the initial OS install on the Signer, and possibly installing the latest updates from the Internet, disconnect Signer from the Internet. The Signer is now purely an offline machine.

Installing Kukai on Signer Machine

On the Workstation

  • Download Kukai stand-alone client from https://github.com/kukai-wallet/kukai/releases. Select the build that matches your OS.
  • Verify the checksum. This is how you ensure that nobody is messing with you and that the wallet has not been modified in any way en-route to your computer.
$ sha256sum kukai_linux_x64_1.0.3.tar.gz
012cf59820c84a7bd4f61414d02ad8196e8f4e317fa7905e81d59efc82da6901 kukai_linux_x64_1.0.3.tar.gz
  • Compare that number to the number on the download page. It must match exactly!
  • Copy kukai_linux_x64_1.0.3.tar.gz to a USB stick and place it somewhere on your Signer machine.

On Signer

  • Extract:
    $ tar zxvf kukai_linux_x64_1.0.3.tar.gz
  • And run:
    $ cd kukai_linux_x64_1.0.3/
    $ ./kukai

>>>>>>>>>>>>>>>>>>>>>>>>>>>>>>>>>>>>>>>>>>>>>>>>>>>>>>>>>>>>>>>>>>>>>>>

00 Intro

>>>>>>>>>>>>>>>>>>>>>>>>>>>>>>>>>>>>>>>>>>>>>>>>>>>>>>>>>>>>>>>>>>>>>>>

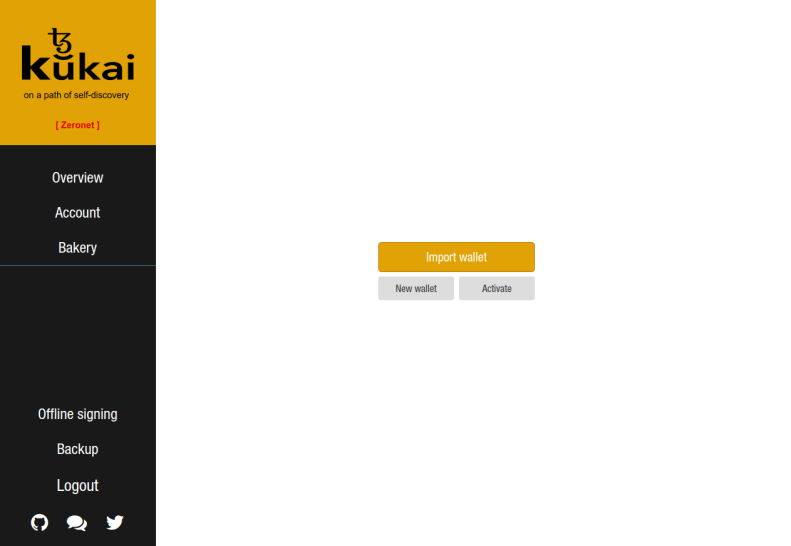
Creating or Importing a Wallet

When Kukai starts, you’ll be presented with different options to get your wallet started. In this guide I’ll assume that you’ll be importing a wallet that was created during the Tezos ICO, but other scenarios will be very similar.

  • If you have not yet activated your Tezos ICO account, do so now by selecting Activate and providing your ‘public key hash’ and your ‘activation code’ (obtained from here: https://verification.tezos.com/).

On Signer

  • Once activated, go to Import wallet -> Retrieve wallet and provide the full wallet information. After you do that correctly, Kukai will ask you to provide an additional password to encrypt your Kukai wallet, which contains your private key (among other things). This means that if someone gets a hold of your Kukai wallet file, it is still useless to them without this password. Please make sure that this password exists only in your head.

Feel free to make this password as long as you need, because humans are very bad at remembering short cryptic passwords like ‘s7ya48u1EE’, and computers are very good at cracking them. Instead, try something like ‘correct;horse;battery’ or ‘enlightened:papal:shrimp’. You’ll never forget it and its super-hard to brute-force or guess a password like that.

You’ll be presented with an Overview screen for your wallet:

>>>>>>>>>>>>>>>>>>>>>>>>>>>>>>>>>>>>>>>>>>>>>>>>>>>>>>>>>>>>>>>>>>>>>>>

02 Overview_out

>>>>>>>>>>>>>>>>>>>>>>>>>>>>>>>>>>>>>>>>>>>>>>>>>>>>>>>>>>>>>>>>>>>>>>>

Exporting Your Wallet

On Signer

The next thing to do is to export 2 versions of the wallet you just created. Go to the Backup menu in Kukai and export:

  1. The Full Wallet. This file will be called something like ‘wallet.tez’, and will contain your public and private keys. Feel free to rename it to something better. This wallet file can be used to gain full access to your tezzies, so be careful with it! Save this file somewhere on the Signer machine and maybe even back it up somewhere else for safety. But don’t stress too much – the private key in this file is encrypted with the password you selected earlier, so the file by itself is still useless without it.
  2. The View-only wallet. You’ll need to enter your wallet password and click on the Generate button. This file allows you to see your tezzies, but not actually access them, because your private key is not in this file. If someone gets a hold of it somehow, all they get is the ability to see how many tezzies you have, and what you have done with them in the past. This is the file we’ll use on the Internet-connected machine (Workstation).

Take the ‘view-only_wallet.tez’, put it on a USB stick and take it to your Workstation machine.

Import View-only wallet

Now that we have our view-only wallet, we can safely use it in Kukai web-client on the connected Workstation. It is convenient, and we no longer have to worry about getting hacked, since our private key is not stored anywhere on the connected Workstation.

On The Workstation:

– Go to https://kukai.app/
Import Wallet -> Import wallet from File and select your ‘view-only_wallet.tez’ file we brought over from the Signer machine.

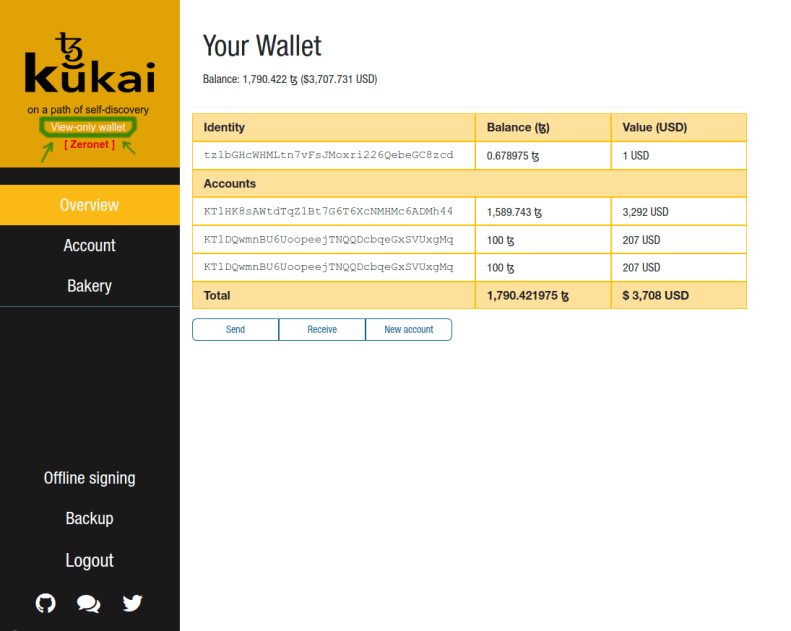
Note that the Overview screen contains all of the account info that we saw on the disconnected Signer machine, and all of the operations like Send, Receive and New Account are still available, but the wallet is marked as “View-only”:

>>>>>>>>>>>>>>>>>>>>>>>>>>>>>>>>>>>>>>>>>>>>>>>>>>>>>>>>>>>>>>>>>>>>>>>

03 View Only Wallet_edit

>>>>>>>>>>>>>>>>>>>>>>>>>>>>>>>>>>>>>>>>>>>>>>>>>>>>>>>>>>>>>>>>>>>>>>>

And that’s it! Your setup is now complete.

Slinging Tezzies

Ok, let’s move some tezzies around. In this example I’ll move 500 XTZ between my own accounts. Let’s say from tz1bGHcWHMLtn7vFsJMoxri226QebeGC8zcd to KT1DQwmnBU6UoopeejTNQQDcbqeGxSVUxgMq. See the picture above for reference.

On The Workstation

  • Go to Overview -> Send
  • From: tz1bGHcWHMLtn7vFsJMoxri226QebeGC8zcd []
  • To Address: KT1DQwmnBU6UoopeejTNQQDcbqeGxSVUxgMq
  • Amount: 500
  • Click Preview -> Confirm
  • You should get a message that says: Your unsigned transaction has been created successfully

>>>>>>>>>>>>>>>>>>>>>>>>>>>>>>>>>>>>>>>>>>>>>>>>>>>>>>>>>>>>>>>>>>>>>>>

05-unsigned-tx-new

>>>>>>>>>>>>>>>>>>>>>>>>>>>>>>>>>>>>>>>>>>>>>>>>>>>>>>>>>>>>>>>>>>>>>>>

  • Download it. Let’s give it a name like ‘demo1.tzop’
  • Put ‘demo1.tzop’ on a USB stick and take it to the Signer machine.

On The Signer

  • Run the native Kukai client (if not already running):
    $ cd kukai_linux_x64_1.0.3/
    $ ./kukai
  • Your Full Wallet should already be loaded here, but if not, just go to Import wallet -> Choose File again and select the full wallet file you saved earlier.
  • Go to Offline Signing -> Sign operation (offline) -> Choose File, and select the unsigned operation file (‘demo1.tzop’).
  • Verify that what you are about to sign with your private key is correct and awesome:

>>>>>>>>>>>>>>>>>>>>>>>>>>>>>>>>>>>>>>>>>>>>>>>>>>>>>>>>>>>>>>>>>>>>>>>

07 Sign Op

>>>>>>>>>>>>>>>>>>>>>>>>>>>>>>>>>>>>>>>>>>>>>>>>>>>>>>>>>>>>>>>>>>>>>>>

  • Type in your wallet password in the Password field and click Sign…………..
  • If all went well, you’ll see a success message saying: ‘Operation successfully signed!
  • Download the signed operation file. Call it something like: ‘demo1_signed.tzop’.
  • Put it on the USB stick and take it to the Workstation.

On the Workstation

  • In Kukai, go to Offline signing -> Broadcast  -> Choose file and select ‘demo1_signed.tzop’ from the USB stick.
  • You can see what you are about to broadcast by clicking Yes on “Would you like to decode the operation?”

>>>>>>>>>>>>>>>>>>>>>>>>>>>>>>>>>>>>>>>>>>>>>>>>>>>>>>>>>>>>>>>>>>>>>>>

09 Broadcast

>>>>>>>>>>>>>>>>>>>>>>>>>>>>>>>>>>>>>>>>>>>>>>>>>>>>>>>>>>>>>>>>>>>>>>>

  • Click Broadcast. You’ll be provided with the Operation Hash for your transaction.

And you are done!

You can go to the Account menu to see the transaction. Or you can use the Block Explorer to look at it:

https://tzscan.io/<Operation Hash>

Final Word

This is clearly a somewhat lengthy process, but some amount of inconvenience is always the trade-off for extra security.

If you do lots of small operations in a day, you could optimize this workflow by creating another Full Wallet on the connected Workstation, with a small amount of tezzies in it – for convenient day-to-day tasks, and keep the majority of your Tezzies in the offline Signer wallet for any large transfers. That way if your Workstation does get compromised, you only lose a small amount of tezzies instead of everything.

I hope this guide was helpful to someone.

Guide to Delegating on Tezos Betanet

Featured

Tags

This guide is written for people that participated in the Tezos ICO, and who now wish to claim their Tezzies (XTZ) and then use them for delegation.

First of all, you need to get your Activation Code from Tezos. Please follow the intructions here: https://verification.tezos.com/

Although delegation is not mandatory, it is an easy way to passively make more XTZ with the ones you already have. If you don’t delegate, you won’t receive a share of the new XTZ created by the Delegated Proof of Stake system that Tezos runs on. This will deflate the value of your tokens compared to users who do participate.

Also, if you happen to own more than a single roll of Tezzies (10,000ꜩ), you are likely more interested in doing your own baking, rather than delegating to someone else. This guide will still be useful to you for the initial setup though.

There are 2 ways you can go about claiming and delegating your Tezzies:

Option 1: Using TezBox Wallet

The easiest way is to use a wallet, such as https://tezbox.com/. This is a very user-friendly option, but it requires you to reveal your private key to the service. If you don’t feel that trusting, read on about how to do everything yourself, which is really simple if you follow this guide.

Option 2: Running Your Own Tezos Node

This is the option the guide focuses on. The guide is written for people on Linux or Mac, but if you are on Windows, you can also follow along by installing Git Bash first (https://git-scm.com/downloads). This will give you both – access to Git and a command-line where  you can type in all the commands in this guide.

Install Docker

Follow the instructions here to install Docker for your OS: https://docs.docker.com/install/

Download the Tezos Project

If you have Git installed, you can clone tezos like this:

$ git clone https://gitlab.com/tezos/tezos.git
$ cd tezos
$ git branch betanet

If you don’t have Git, go to https://gitlab.com/tezos/tezos.git, click on the branch selector drop-down that currently says “master”, and change it to “betanet”. Now use the Download button in the upper right-hand corner to download the code.

Open Port 9732 In Your Firewall

This port is used by Tezos network protocol to connect to peers, so it needs to be open. The details of this are different depending on your setup, so left as an exercise for the reader. Just make sure that this port is open and routed to the box you are going to be running the Tezos Node on.

Run a Tezos Node

Make sure that you are in the directory where you placed the Tezos code and run

$ cd tezos/scripts/

There’s a script here called betanet.sh. We’ll use this script to interact with the Tezos node running inside a Docker container.

Lets start the node now:

$ ./betanet.sh node start

This command will do a lot of things:

  1. Download the Tezos Docker containers.
  2. Use Docker Compose to deploy the Node, the Baker, the Endorser and the Accuser as services. We are only going to use the Node in this guide, but those other services are now also ready to go, should you choose to try baking yourself.
  3. Start the Node
  4. Generate a new network identity
  5. Discover and connect to network peers
  6. Start downloading the entire blockchain

This last step will take a long time! You will just need to wait. You can monitor the progress in a couple of ways. You can see the log output from the node like this:

$ docker ps -q
7c04ab2f4c5e
$ docker logs 7c04ab2f4c5e --tail 40 -f

These commands discover the Container ID where the Tezos node is running, and then attach to the STDOUT and STDERR outputs of that container. You will now get a lot of scrolling info, telling you what the node is doing.

You can see the network connections your node has made like this:

$ ./betanet.sh client rpc get /network/connections

You can also monitor how much of the blockchain the node has downloaded so far:

$ ./betanet.sh head

This will print a lot of output, showing you the information about the top block the node has so far. The interesting part here is the “timestamp” field near the top. We can monitor that field like this:

$ watch "./betanet.sh head | grep timestamp"

We need to wait until that “timestamp” catches up with current time.

Do not proceed with the guide until that’s done!

Activate Your Account On The Blockchain

Now that your node is fully synced, we can start to inject changes into the blockchain.

First, lets create an alias for our public address. This information is found in the wallet you got during the ICO:

$ ./betanet.sh client add address ico_key tz1NQo6LNh4isv8Gavc53EGy5TozLRCAkXzB
$ ./betanet.sh client list known addresses
ico_key: tz1NQo6LNh4isv8Gavc53EGy5TozLRCAkXzB

In this case we chose the name “ico_key“, but you can call it anything you want.

And now the actual activation.  <activation_key> is provided to you when you complete the KYC process.

$ ./betanet.sh client activate fundraiser account ico_key with <activation_key>

Node is bootstrapped, ready for injecting operations.
Operation successfully injected in the node.
Operation hash: ooWpYVXe466VC48nwbiFeRR2Djeg4u3CCYkLuSoUfxfeG6TAU1w
Waiting for the operation to be included...
Operation found in block: BKivKRERjTWCWZJAYxADaFeUiA42XjYKkiet6HqNxkDNDATbMbX (pass: 2, offset: 0)
This sequence of operations was run:
Genesis account activation:
Account: tz1NQo6LNh4isv8Gavc53EGy5TozLRCAkXzB
Balance updates:
tz1NQo6LNh4isv8Gavc53EGy5TozLRCAkXzB ... +ꜩ1521

The operation has only been included 0 blocks ago.
We recommend to wait more.
Use command
tezos-client wait for ooWpYVXe466VC48nwbiFeRR2Djeg4u3CCYkLuSoUfxfeG6TAU1w to be included --confirmations 30
and/or an external block explorer.
Account ico_key (tz1NQo6LNh4isv8Gavc53EGy5TozLRCAkXzB) activated with ꜩ1521.

Note that there’s a command given to you in the end:

$ ./betanet.sh client wait for ooWpYVXe466VC48nwbiFeRR2Djeg4u3CCYkLuSoUfxfeG6TAU1w to be included --confirmations 30

If you run that, you’ll get a message every time your transaction is baked into a block, all the way up to 30 blocks.

You can also use the block explorer to monitor that progress. In this example, it would be here: http://tzscan.io/ooWpYVXe466VC48nwbiFeRR2Djeg4u3CCYkLuSoUfxfeG6TAU1w

Import Your Private Key

Now we are ready to access our tezzies. Of course, that will require the private key from the wallet you got during the ICO.

So, import the private key into our node:

$ ./betanet.sh client import fundraiser secret key ico_key

This will ask you some questions, including all the words in the mnemonic in the wallet. Enter all the data it asks for.

Now let’s check our work:

$ ./betanet.sh client show address ico_key -S
Hash: tz1NQo6LNh4isv8Gavc53EGy5TozLRCAkXzB
Public Key: <.........>
Secret Key: encrypted:<.........>

And finally, let’s check the balance in our account:

$ ./betanet.sh client get balance for ico_key
1521 ꜩ

Setting Up Delegation

We are now ready to put our tezzies to work.

The first step is to decide who you are going to Delegate your baking to. This list of Delegators here is an excellent resource to help you make the choice: https://www.mytezosbaker.com/bakers-list/.

Let’s say that we decided to go with Tz Vote: http://tzscan.io/tz1bHzftcTKZMTZgLLtnrXydCm6UEqf4ivca

Let’s create an alias for them:

$ ./betanet.sh client add address Tezos_Vote tz1bHzftcTKZMTZgLLtnrXydCm6UEqf4ivca

Now we create an “originated” smart contract called “ico_key_originated“, managed by the account we activated (called “ico_key” in this guide), and delegated to “Tezos_Vote”. We also transfer all the money from “ico_key” into the new smart contract “ico_key_originated”:

$ /betanet.sh client originate account ico_key_originated for ico_key transferring 1520.742 from ico_key --delegate Tezos_Vote --fee 0.0

Node is bootstrapped, ready for injecting operations.
Estimated storage: no bytes added
Enter password for encrypted key: 
Operation successfully injected in the node.
Operation hash: ooCj9jGio6oCMksnuZQ5EE42h93VSM3c2hRuc3z4W1XXmyyURpK
Waiting for the operation to be included...
Operation found in block: BLkvov4WBkr4hN4RTNXePRwfgj2wpvu6pUfHzr2cizGZbcXxiTt (pass: 3, offset: 0)
This sequence of operations was run:
Manager signed operations:
From: tz1NQo6LNh4isv8Gavc53EGy5TozLRCAkXzB
Fee to the baker: ꜩ0
Expected counter: 45247
Gas limit: 0
Storage limit: 0 bytes
Revelation of manager public key:
Contract: tz1NQo6LNh4isv8Gavc53EGy5TozLRCAkXzB
Key: edpku7CbCYBFhYw1NfU26sGo7asGsvZcvew1VsygxwHoWr6emY5Cq6
This revelation was successfully applied
Manager signed operations:
From: tz1NQo6LNh4isv8Gavc53EGy5TozLRCAkXzB
Fee to the baker: ꜩ0
Expected counter: 45248
Gas limit: 0
Storage limit: 0 bytes
Origination:
From: tz1NQo6LNh4isv8Gavc53EGy5TozLRCAkXzB
For: tz1NQo6LNh4isv8Gavc53EGy5TozLRCAkXzB
Credit: ꜩ1520.742
No script (accepts all transactions)
Delegate: tz1bHzftcTKZMTZgLLtnrXydCm6UEqf4ivca
Spendable by the manager
This origination was successfully applied
Originated contracts:
KT1PUFGwJB9qtWfdbzgURni3JykVBycdwwAK
Consumed gas: 0
Balance updates:
tz1NQo6LNh4isv8Gavc53EGy5TozLRCAkXzB ... -ꜩ0.257
tz1NQo6LNh4isv8Gavc53EGy5TozLRCAkXzB ... -ꜩ1520.742
KT1PUFGwJB9qtWfdbzgURni3JykVBycdwwAK ... +ꜩ1520.742

New contract KT1PUFGwJB9qtWfdbzgURni3JykVBycdwwAK originated.
The operation has only been included 0 blocks ago.
We recommend to wait more.
Use command
tezos-client wait for ooCj9jGio6oCMksnuZQ5EE42h93VSM3c2hRuc3z4W1XXmyyURpK to be included --confirmations 30
and/or an external block explorer.
Contract memorized as ico_key_originated.

The above command is certainly confusing. To understand some more details about what happened there, please refer to this excellent article:  http://archive.li/NsPFt (section “How to Delegate and Understanding Implicit and Generated Accounts”)

As with our previous injection, we can either use our node:

$ ./betanet.sh client wait for ooCj9jGio6oCMksnuZQ5EE42h93VSM3c2hRuc3z4W1XXmyyURpK to be included --confirmations 30

Or the Block Explorer: http://tzscan.io/ooCj9jGio6oCMksnuZQ5EE42h93VSM3c2hRuc3z4W1XXmyyURpK

to monitor the progress of our transaction.

There’s an important subtlety to notice here. The balance in my “ico_key” account was 1521ꜩ, yet in the command above I only transferred 1520.742ꜩ. Why is that?

Well, if we try to transfer the entire amount, we get this error:

Error:
  Unregistred error:
     { "kind": "temporary",
       "id": "proto.002-PsYLVpVv.gas_exhausted.operation" }

The problem here is that some of our tezzies need to be burned in order to pay for executing the transfer and delegation. In this case the required fee was 0.257ꜩ, which is why I only transferred 1520.742ꜩ.

So, let’s check everything now to make sure that the transfer worked, and that the delegate is established:

$ ./betanet.sh client list known contracts
ico_key_originated: KT1PUFGwJB9qtWfdbzgURni3JykVBycdwwAK
Tezos_Vote: tz1bHzftcTKZMTZgLLtnrXydCm6UEqf4ivca
ico_key: tz1NQo6LNh4isv8Gavc53EGy5TozLRCAkXzB

$ ./betanet.sh client get balance for ico_key
0.001 ꜩ

$ ./betanet.sh client get balance for ico_key_originated
1520.742 ꜩ

$ ./betanet.sh client get delegate for ico_key_originated
tz1bHzftcTKZMTZgLLtnrXydCm6UEqf4ivca (known as Tezos_Vote)

And that’s it.

Resources and References

Here’s the list of most useful materials that I used while figuring this out:

Installing Linux Mint 21.2 (Victoria) On ASUS ExpertCenter PN42

Tags

,

  1. Hardware
    1. Buying
    2. Specs
  2. Installation
  3. Fixing HDMI Sound
    1. Intel Video Driver (i915)
    2. Kernel Version
    3. Solution

Hardware

Buying

https://www.amazon.com/dp/B0C5Q7M23L

Specs

$ inxi -Fxxxz
System:
Kernel: 6.5.0-14-generic x86_64 bits: 64 compiler: N/A Console: pty pts/1 DM: LightDM 1.30.0
Distro: Linux Mint 21.2 Victoria base: Ubuntu 22.04 jammy

Machine:
Type: Mini-pc System: ASUSTeK product: MINIPC PN42 v: N/A serial: <filter>
Mobo: ASUSTeK model: PN42 serial: N/A UEFI: ASUSTeK v: 1.02.00 date: 02/15/2023

Battery:
Device-1: hidpp_battery_0 model: Logitech Wireless Touch Keyboard K400 Plus serial: <filter>
charge: 50% (should be ignored) rechargeable: yes status: N/A

CPU:
Info: quad core model: Intel N100 bits: 64 type: MCP smt: <unsupported> arch: N/A rev: 0 cache:
L1: 384 KiB L2: 2 MiB L3: 6 MiB
Speed (MHz): avg: 702 high: 706 min/max: 700/3400 volts: 1.0 V ext-clock: 100 MHz cores:
1: 706 2: 700 3: 702 4: 700 bogomips: 6451
Flags: avx avx2 ht lm nx pae sse sse2 sse3 sse4_1 sse4_2 ssse3 vmx

Graphics:
Device-1: Intel vendor: ASUSTeK driver: i915 v: kernel ports: active: HDMI-A-1
empty: DP-1, DP-2, HDMI-A-2, HDMI-A-3 bus-ID: 00:02.0 chip-ID: 8086:46d1 class-ID: 0300
Display: server: X.org v: 1.21.1.4 with: Xwayland v: 22.1.1 compositor: xfwm driver: X:
loaded: modesetting unloaded: fbdev,vesa gpu: i915 tty: 190x48
Monitor-1: HDMI-A-1 model: Samsung serial: <filter> res: 1920x1080 dpi: 43
size: 1124x627mm (44.3x24.7") diag: 1287mm (50.7") modes: max: 1920x1080 min: 720x400
Message: GL data unavailable in console for root.

Audio:
Device-1: Intel vendor: ASUSTeK driver: snd_hda_intel v: kernel bus-ID: 00:1f.3
chip-ID: 8086:54c8 class-ID: 0403
Sound Server-1: ALSA v: k6.5.0-14-generic running: yes
Sound Server-2: PulseAudio v: 15.99.1 running: yes
Sound Server-3: PipeWire v: 0.3.48 running: yes

Network:
Device-1: Intel driver: iwlwifi v: kernel port: N/A bus-ID: 00:14.3 chip-ID: 8086:54f0
class-ID: 0280
IF: wlo1 state: up mac: <filter>

Device-2: Realtek RTL8125 2.5GbE vendor: ASUSTeK driver: r8169 v: kernel pcie: speed: 5 GT/s
lanes: 1 port: 4000 bus-ID: 01:00.0 chip-ID: 10ec:8125 class-ID: 0200
IF: enp1s0 state: down mac: <filter>

Device-3: Realtek RTL8125 2.5GbE vendor: ASUSTeK driver: r8169 v: kernel pcie: speed: 5 GT/s
lanes: 1 port: 3000 bus-ID: 03:00.0 chip-ID: 10ec:8125 class-ID: 0200
IF: enp3s0 state: down mac: <filter>

Bluetooth:
Device-1: Intel type: USB driver: btusb v: 0.8 bus-ID: 1-10:3 chip-ID: 8087:0033 class-ID: e001
Report: hciconfig ID: hci0 rfk-id: 0 state: up address: <filter>

Drives:
Local Storage: total: 238.47 GiB used: 25.87 GiB (10.8%)
ID-1: /dev/nvme0n1 vendor: Patriot model: M.2 P300 256GB size: 238.47 GiB speed: 31.6 Gb/s
lanes: 4 type: SSD serial: <filter> rev: V0808A0 temp: 49.9 C scheme: GPT

Partition:
ID-1: / size: 233.18 GiB used: 25.86 GiB (11.1%) fs: ext4 dev: /dev/nvme0n1p2
ID-2: /boot/efi size: 511 MiB used: 6.1 MiB (1.2%) fs: vfat dev: /dev/nvme0n1p1

Swap:
ID-1: swap-1 type: file size: 2 GiB used: 0 KiB (0.0%) priority: -2 file: /swapfile

Sensors:
System Temperatures: cpu: 50.0 C mobo: N/A
Fan Speeds (RPM): N/A

Info:
Processes: 253 Uptime: 9h 52m wakeups: 93 Memory: 15.36 GiB used: 1.46 GiB (9.5%) Init: systemd
v: 249 runlevel: 5 Compilers: gcc: 11.4.0 alt: 11/12 Packages: 2196 apt: 2190 flatpak: 6
Shell: Bash (su) v: 5.1.16 running-in: pty pts/1 (SSH) inxi: 3.3.13

Installation

The installation went smoothly with default settings, but there was no sound on the HDMI outputs. There was sound on the headphone jack, but no HDMI devices were listed in the sound settings.

This was indeed confirmed by:

$ aplay -l
**** List of PLAYBACK Hardware Devices ****
card 0: Intel [HDA Intel], device 0: ALC256 Analog [ALC256 Analog]
  Subdevices: 1/1
  Subdevice #0: subdevice #0
  
===> MISSING HDMI DEVICES! <===
$ pacmd list-cards
    index: 0
	name: <alsa_card.pci-0000_00_1f.3>
	driver: <module-alsa-card.c>
	owner module: 7
	properties:
		alsa.card = "0"
		alsa.card_name = "HDA Intel"
		alsa.long_card_name = "HDA Intel at 0x6001140000 irq 140"
		alsa.driver_name = "snd_hda_intel"
		device.bus_path = "pci-0000:00:1f.3"
		sysfs.path = "/devices/pci0000:00/0000:00:1f.3/sound/card0"
		device.bus = "pci"
		device.vendor.id = "8086"
		device.vendor.name = "Intel Corporation"
		device.product.id = "54c8"
		device.form_factor = "internal"
		device.string = "0"
		device.description = "Built-in Audio"
		module-udev-detect.discovered = "1"
		device.icon_name = "audio-card-pci"
	profiles:
		input:analog-stereo: Analog Stereo Input (priority 65, available: no)
		output:analog-stereo: Analog Stereo Output (priority 6500, available: no)
		output:analog-stereo+input:analog-stereo: Analog Stereo Duplex (priority 6565, available: no)
		off: Off (priority 0, available: unknown)
		
		===> MISSING HDMI PROFILES! <===
		
	active profile: <off>
	ports:
		analog-input-mic: Microphone (priority 8700, latency offset 0 usec, available: no)
			properties:
				device.icon_name = "audio-input-microphone"
		analog-output-lineout: Line Out (priority 9000, latency offset 0 usec, available: no)
			properties:

		analog-output-headphones: Headphones (priority 9900, latency offset 0 usec, available: no)
			properties:
				device.icon_name = "audio-headphones"

		===> MISSING HDMI PORTS! <===

Fixing HDMI Sound

Further investigation revealed that the video driver was not loaded:

$ sudo lshw -class display
*-display UNCLAIMED   <=== This means that no driver is loaded for this device!

     description: VGA compatible controller
     product: Intel Corporation
     vendor: Intel Corporation
     physical id: 2
     bus info: pci@0000:00:02.0
     version: 00
     width: 64 bits
     clock: 33MHz
     capabilities: pciexpress msi pm vga_controller bus_master cap_list
     configuration: latency=0
     resources: iomemory:600-5ff iomemory:400-3ff memory:6000000000-6000ffffff memory:4000000000-400fffffff ioport:5000(size=64) memory:c0000-dffff memory:4010000000-4016ffffff memory:4020000000-40ffffffff

Further confirmation:

$ lspci -nk -s 00:02.0
00:02.0 0300: 8086:46d1
  DeviceName: Onboard - Video
  Subsystem: 1043:8898
  
  ===> MISSING DRIVER INFO! <===

Intel Video Driver (i915)

Since this is an Intel CPU with integrated graphics, the Intel i915 video driver should be loaded, but it clearly isn’t.

Checking if the graphics card is supported: https://dgpu-docs.intel.com/devices/hardware-table.html

We can see that indeed it is:

PCI IDNameArchitectureCodename
46D1Intel® UHD GraphicsXe (Gen12)Alder Lake-N

Attempts to insert the driver manually (modprobe -vvv i915) produced no errors, but also no results.

Kernel Version

Further research revealed that support for Alder Lake-N graphics was added in kernel version 5.18:

From the pull request for 5.18:

Driver Changes:
---------------

i915:
- ADL-N platform enabling (Tejas)

However, Linux Mint 21.2 comes with kernel version 5.15 installed by default, which is too old to support this graphics card.

Solution

Upgrade the kernel by going to Update Manager > View > Kernels and install at least version 5.19 or higher.

I tried both 5.19 and 6.5, and both worked fine.

After rebooting, the video driver was loaded and the HDMI sound devices were available.

$ lspci -nk -s 00:02.0
00:02.0 0300: 8086:46d1
	DeviceName: Onboard - Video
	Subsystem: 1043:8898
	Kernel driver in use: i915
	Kernel modules: i915

$ sudo lshw -class display
  *-display
       description: VGA compatible controller
       product: Intel Corporation
       vendor: Intel Corporation
       physical id: 2
       bus info: pci@0000:00:02.0
       logical name: /dev/fb0
       version: 00
       width: 64 bits
       clock: 33MHz
       capabilities: pciexpress msi pm vga_controller bus_master cap_list rom fb
       configuration: depth=32 driver=i915 latency=0 mode=1920x1080 resolution=1920,1080 visual=truecolor xres=1920 yres=1080
       resources: iomemory:600-5ff iomemory:400-3ff irq:133 memory:6000000000-6000ffffff memory:4000000000-400fffffff ioport:5000(size=64) memory:c0000-dffff memory:4010000000-4016ffffff memory:4020000000-40ffffffff
$ lsmod | grep i915
Module                  Size  Used by
i915                 4157440  6
drm_buddy              20480  1 i915
i2c_algo_bit           16384  1 i915
ttm                   110592  1 i915
drm_display_helper    241664  1 i915
cec                    94208  2 drm_display_helper,i915
drm_kms_helper        270336  2 drm_display_helper,i915
drm                   761856  9 drm_kms_helper,drm_display_helper,drm_buddy,i915,ttm
video                  73728  2 asus_wmi,i915
$ aplay -l
**** List of PLAYBACK Hardware Devices ****
card 0: PCH [HDA Intel PCH], device 0: ALC256 Analog [ALC256 Analog]
  Subdevices: 1/1
  Subdevice #0: subdevice #0
card 0: PCH [HDA Intel PCH], device 3: HDMI 0 [HDMI 0]
  Subdevices: 1/1
  Subdevice #0: subdevice #0
card 0: PCH [HDA Intel PCH], device 7: HDMI 1 [HDMI 1]
  Subdevices: 1/1
  Subdevice #0: subdevice #0
card 0: PCH [HDA Intel PCH], device 8: HDMI 2 [HDMI 2]
  Subdevices: 1/1
  Subdevice #0: subdevice #0
card 0: PCH [HDA Intel PCH], device 9: HDMI 3 [HDMI 3]
  Subdevices: 1/1
  Subdevice #0: subdevice #0

$ pacmd list-cards
1 card(s) available.
    index: 0
	name: <alsa_card.pci-0000_00_1f.3>
	driver: <module-alsa-card.c>
	owner module: 7
	properties:
		alsa.card = "0"
		alsa.card_name = "HDA Intel PCH"
		alsa.long_card_name = "HDA Intel PCH at 0x6001140000 irq 142"
		alsa.driver_name = "snd_hda_intel"
		device.bus_path = "pci-0000:00:1f.3"
		sysfs.path = "/devices/pci0000:00/0000:00:1f.3/sound/card0"
		device.bus = "pci"
		device.vendor.id = "8086"
		device.vendor.name = "Intel Corporation"
		device.product.id = "54c8"
		device.form_factor = "internal"
		device.string = "0"
		device.description = "Built-in Audio"
		module-udev-detect.discovered = "1"
		device.icon_name = "audio-card-pci"
	profiles:
		input:analog-stereo: Analog Stereo Input (priority 65, available: no)
		output:analog-stereo: Analog Stereo Output (priority 6500, available: no)
		output:analog-stereo+input:analog-stereo: Analog Stereo Duplex (priority 6565, available: no)
		output:hdmi-stereo: Digital Stereo (HDMI) Output (priority 5900, available: no)
		output:hdmi-stereo+input:analog-stereo: Digital Stereo (HDMI) Output + Analog Stereo Input (priority 5965, available: no)
		output:hdmi-stereo-extra1: Digital Stereo (HDMI 2) Output (priority 5700, available: no)
		output:hdmi-stereo-extra1+input:analog-stereo: Digital Stereo (HDMI 2) Output + Analog Stereo Input (priority 5765, available: no)
		output:hdmi-surround-extra1: Digital Surround 5.1 (HDMI 2) Output (priority 600, available: no)
		output:hdmi-surround-extra1+input:analog-stereo: Digital Surround 5.1 (HDMI 2) Output + Analog Stereo Input (priority 665, available: no)
		output:hdmi-surround71-extra1: Digital Surround 7.1 (HDMI 2) Output (priority 600, available: no)
		output:hdmi-surround71-extra1+input:analog-stereo: Digital Surround 7.1 (HDMI 2) Output + Analog Stereo Input (priority 665, available: no)
		output:hdmi-stereo-extra2: Digital Stereo (HDMI 3) Output (priority 5700, available: no)
		output:hdmi-stereo-extra2+input:analog-stereo: Digital Stereo (HDMI 3) Output + Analog Stereo Input (priority 5765, available: no)
		output:hdmi-surround-extra2: Digital Surround 5.1 (HDMI 3) Output (priority 600, available: no)
		output:hdmi-surround-extra2+input:analog-stereo: Digital Surround 5.1 (HDMI 3) Output + Analog Stereo Input (priority 665, available: no)
		output:hdmi-surround71-extra2: Digital Surround 7.1 (HDMI 3) Output (priority 600, available: no)
		output:hdmi-surround71-extra2+input:analog-stereo: Digital Surround 7.1 (HDMI 3) Output + Analog Stereo Input (priority 665, available: no)
		output:hdmi-stereo-extra3: Digital Stereo (HDMI 4) Output (priority 5700, available: no)
		output:hdmi-stereo-extra3+input:analog-stereo: Digital Stereo (HDMI 4) Output + Analog Stereo Input (priority 5765, available: no)
		output:hdmi-surround-extra3: Digital Surround 5.1 (HDMI 4) Output (priority 600, available: no)
		output:hdmi-surround-extra3+input:analog-stereo: Digital Surround 5.1 (HDMI 4) Output + Analog Stereo Input (priority 665, available: no)
		output:hdmi-surround71-extra3: Digital Surround 7.1 (HDMI 4) Output (priority 600, available: no)
		output:hdmi-surround71-extra3+input:analog-stereo: Digital Surround 7.1 (HDMI 4) Output + Analog Stereo Input (priority 665, available: no)
		off: Off (priority 0, available: unknown)
	active profile: <off>
	ports:
		analog-input-mic: Microphone (priority 8700, latency offset 0 usec, available: no)
			properties:
				device.icon_name = "audio-input-microphone"
		analog-output-lineout: Line Out (priority 9000, latency offset 0 usec, available: no)
			properties:

		analog-output-headphones: Headphones (priority 9900, latency offset 0 usec, available: no)
			properties:
				device.icon_name = "audio-headphones"
		hdmi-output-0: HDMI / DisplayPort (priority 5900, latency offset 0 usec, available: no)
			properties:
				device.icon_name = "video-display"
		hdmi-output-1: HDMI / DisplayPort 2 (priority 5800, latency offset 0 usec, available: no)
			properties:
				device.icon_name = "video-display"
		hdmi-output-2: HDMI / DisplayPort 3 (priority 5700, latency offset 0 usec, available: no)
			properties:
				device.icon_name = "video-display"
		hdmi-output-3: HDMI / DisplayPort 4 (priority 5600, latency offset 0 usec, available: no)
			properties:
				device.icon_name = "video-display"

Figuring out the speed of your USB stick and USB port

Tags

, , ,

Ever wonder why you USB transfer is taking so long? This guide will explain how to definitively understand what you can expect from your USB stick on a Linux computer.

Testing The Speed

First, we should see what transfer rates we are actually getting. We will use the 'dd' utility for this purpose.

Read

dd if=/dev/sdc of=/dev/null bs=1M count=1024
          !^^^!
1024+0 records in
1024+0 records out
1073741824 bytes (1.1 GB, 1.0 GiB) copied, 8.64301 s, 124 MB/s

Make sure to replace ‘sdc' with the device name of your USB stick!

Write

dd if=/dev/zero of=/dev/sdc bs=1M count=500
                       !^^^!
500+0 records in
500+0 records out
524288000 bytes (524 MB, 500 MiB) copied, 44.7914 s, 11.7 MB/s

Make sure to replace ‘sdc' with the device name of your USB stick!

This command can take a long time if your write speed is very slow. Consider lowering count=500 down to count=150, for example.

So why is it so slow?

USB Standard

USB 2 is a very slow standard, so if either your computer port or your stick are USB 2, that is the reason for the slow transfer rate.

Checking Version of Computer Port

If the port on the computer is blue, then it’s definitely USB 3.

But if not, then you need to check:

❰val❙~❱✔≻ lsusb | grep 'root hub'
Bus 002 Device 001: ID 1d6b:0002 Linux Foundation 2.0 root hub
Bus 001 Device 001: ID 1d6b:0002 Linux Foundation 2.0 root hub
Bus 004 Device 001: ID 1d6b:0003 Linux Foundation 3.0 root hub  <= Yep - we have USB 3
Bus 003 Device 001: ID 1d6b:0002 Linux Foundation 2.0 root hub

Checking Version of USB Stick

If the port connector is blue, then it’s definitely USB 3.

But if not, then you need to check. For example, here’s a USB 2 stick:

❰val❙~❱✔≻ lsusb | grep '<name of USB stick>'
Bus 003 Device 075: ID 346d:5678 USB Disk 2.0
    ^^^        ^^^

❰val❙~❱✔≻ lsusb -D /dev/bus/usb/003/075 | grep bcdUSB
                                ^^^ ^^^
  bcdUSB               2.00

And here’s a USB 3 stick:

❰val❙~❱✔≻ lsusb -D /dev/bus/usb/004/006 | grep bcdUSB
                                ^^^ ^^^
  bcdUSB               3.20

Other Reasons for Slowness

File System Format

Some file systems are slower than others. FAT32 is generally much slower than NTFS or EXT4.

Try a Different Port

Rarely, but sometimes, the issue might be with the USB port itself. Try a different one!

Conclusion

For best results, make sure to match USB 3 sticks to USB 3 computer ports, and don’t use FAT32 file system.

Hope this helps.

Easy Way to Remove DRM Encryption from Kindle Books

Calibre + DeDRM plugin are the best way to remove DRM from your books and convert them to other formats. Trouble is, these tools are difficult to setup, especially on Linux. It can easily take days of effort to figure out all the details to get it working.

To address this problem I’ve made a Docker image that automates all of the setup details, so you don’t need to worry about any of it.

Follow the simple instructions here, and regain ownership of your books in minutes (assuming you have Docker already installed):

https://github.com/vace117/calibre-dedrm-docker-image

Can a Truck Boil a Kettle?

This post will deviate from computer-related posts and document a life-hack calculation instead. This question came up when my girlfriend and I were packing for a road trip in our F-150 truck. We were thinking of bringing an electric kettle with us, but we wanted to know if the truck’s battery would be up to the task of boiling the kettle. This post documents the calculations for posterity.

F-150 Battery

Voltage : 12V
Capacity: 72Ah
Cranking Amps: 900A (we can safely draw 900A for 30s, with voltage staying above 7.2V)

The Kettle

Average Power Usage: 2200W
Time to boil: 200s

Battery Usage

Amount of Energy needed: 2200W * (1h * 200s / 3600s) = 122.22Wh
Plus inefficiency of the inverter (85%): 122.22Wh / 0.85 = 143.78Wh
Amp-hours of battery needed: 143.78Wh / 12V = 11.98Ah
So, boiling a kettle drains: 11.98Ah / 72Ah = 16.7% of battery

However

Kettle will continuously draw:

11.98Ah / (1h * 200s / 3600s) = 217.82 Amps

If we assume a linear degradation of voltage, then time to 7.2V (based on battery’s Cold Cranking Amps (CCA)) at 217.82A draw is:

30s / (217.82A/900A) = 123.95 seconds

So the battery can supply the necessary current for 123.95 seconds, but we need 200 seconds to boil the kettle. So, even though we only need 16.7% of battery, the rate of consumption takes the battery voltage below 7.2V for

(200s - 123.95s) = 76.05 seconds

Summary

Boiling a kettle uses 16.7% of battery capacity, but for the last 76 seconds the battery is pushed into operating outside of the designed parameters due to rate of discharge. Don’t know how serious or not serious that is. Please comment if you know more! We used the kettle in the truck, and it worked, so this calculation is supported by empirical evidence :).

Setting Up Sublime Text for Javascript Development

Sublime Text is one of the best light-weight text editors in existence right now. It is a favourite of many developers, b/c of its beautiful UI, speed and a diverse ecosystem of extensions. This article explains how to use Sublime Text to create a powerful, yet light-weight Javascript development environment.

At the end of these instructions, you’ll be able to do the following in Sublime:

  • Choose from many beautiful syntax highlight themes for your code, be it Javascript, JSON, HTML, S(CSS), Vue, etc.
  • Automatically lint and format your code as you type, or on every save.
  • Work with version control using Git from Sublime.
  • Execute Javascript code in current file and get immediate results
  • Transpile Javascript code in current file into ES5

These instructions show the paths and versions as they were on my Linux machine. Please use your common sense to change these appropriately for your environment.

Installing Prerequisite Tools

Install NVM

Follow the instructions here: https://github.com/creationix/nvm#installation-and-update, but it will be something like the following:

$ curl -o- https://raw.githubusercontent.com/creationix/nvm/v0.34.0/install.sh | bash
$ nvm ls-remote --lts
$ nvm install v10.15.3 <=== Selecting Latest LTS here!

Install ESLint

$ npm install -g eslint

Install Babel

$ npm install -g @babel/core @babel/cli @babel/preset-env

Install Prettier

$ npm install -g prettier

Install VueJS

$ npm install -g @vue/cli

Sublime Setup

  • Go to Tools -> Command Palette (Learn to use “Ctrl-Shift-P” – you will use it very frequently, b/c it’s awesome!), Type: ‘Install’, select ‘Install Package Control
  • Repeat this step for all the packages listed below. Press Ctrl-Shift-P, and Type: ‘Install Package‘, and then install the following packages:
      • SublimeLinter
      • Babel
      • Pretty JSON
      • JsPrettier
      • SublimeLinter-eslint
      • ESLint-Formatter
      • Autocomplete Javascript with Method Signature
      • HTML-CSS-JS Prettify
      • Vue Syntax Highlight
      • SideBar Enhancements
      • GitGutter
      • Bracket​Highlighter
      • Markdown Preview
      • MarkdownLivePreview
      • SublimeLinter-java

Package Configuration

Global ESLint Settings

Create ~/.eslintrc.js file. ESLint will look there for settings when it cannot find a local project-specific config file.

module.exports = {
    "env": {
        "node": true,
        "browser": true,
        "es6": true
    },
    "extends": "eslint:recommended",
    "globals": {
        "Atomics": "readonly",
        "SharedArrayBuffer": "readonly"
    },
    "parserOptions": {
        "ecmaVersion": 2018,
        "sourceType": "module"
    },
    "rules": {
        "no-console": "off",
        "indent": ["error", 2]
    }
};

Configure Babel

Go to Preferences -> Package Settings -> Babel -> Settings - Default. Update the path:

{
  "debug": false,
  "use_local_babel": true,
  "node_modules": {
    "linux": "/home/val/.nvm/versions/node/v10.15.3/lib/node_modules/@babel/core/node_modules"
  },
  "options": {}
}

Configure ESLint Formatter

Go to Preferences -> Package Settings -> ESLint Formatter -> Settings. Update the paths:

{
  "node_path": {
    "linux": "/home/val/.nvm/versions/node/v10.15.3/bin/node"
  },

  "eslint_path": {
    "linux": "/home/val/.nvm/versions/node/v10.15.3/bin/eslint"
  },

  // Automatically format when a file is saved.
  "format_on_save": true,
}

Configure JsPrettier

Go to Preferences -> Package Settings -> JsPrettier -> Settings - Default. Update the path:

"prettier_cli_path": "/home/val/.nvm/versions/node/v10.15.3/bin/prettier",
    "node_path": "/home/val/.nvm/versions/node/v10.15.3/bin/node",

"disable_tab_width_auto_detection": true,

Configure GLobal Theme

Go to Preferences -> Theme -> select 'Adaptive.sublime-theme'

Configure JS Prettify

Go to Preferences -> Package Settings -> HTML / CSS / JS Prettify -> Plugin Options - Default. Update the path:

   "node_path":
    {
        "linux": "/home/val/.nvm/versions/node/v10.15.3/bin/node"
    },

Configure Global Settings

Go to Preferences -> Settings. Add:

{
    "ensure_newline_at_eof_on_save": true,
    "ignored_packages":
    [
        "Vintage"
    ],
    "translate_tabs_to_spaces": true,
    "trim_trailing_white_space_on_save": true
}

You should now have everything you need for Javascript development. Note that we have installed multiple formatters that do the same thing. This is b/c they are good at different things, and this gives you options. You’ll need to explore the capabilities by opening a source file, selecting some text (or not), and using the Command Palette (Ctrl-Shift-P) to type things like “Format” or “lint” or “Pretty” or “JSON” or “Syntax“, to see what capabilities you have, and which packages you like best for which tasks.


Setting up in-place REPL and Transpile

The following steps will allow you to run any javascript code in the currently open file immediately. You will also be able to transpile the code into ES5 javascript instead of running it.

First, create a Babel config file: ~/sublime-babelrc.js

module.exports = {
    "presets": [
        ["/home/val/.nvm/versions/node/v10.15.3/lib/node_modules/@babel/preset-env", {
            "targets": {
                "ie": 10
            },
            "modules": false
        }]
    ]
}

Go to Tools -> Build System -> New Build System... Paste this into the file and save with a name like "JavaScript Builder.sublime-build":

{
    "selector": "source.js",

    "variants": [
        {
            "name": "Run JavaScript",
            "cmd": ["node", "$file"]
        },

        {
            "name": "Transpile to ES5",
            "cmd": ["babel", "--config-file=/home/val/sublime-babelrc.js", "$file"]
        }
    ]
}

Whenever you are in a JavaScript file, you can now press Ctrl-Shift-B, and select one of your build variants. Ctrl-B will run the last variant you selected.

Guide to Selective Routing Through a VPN

This guide explains how to use a VPN service to selectively route torrent traffic only, leaving all other Internet access on the computer unaffected.

This guide assumes a Linux workstation. Sorry Windows users, but I have no idea if something like this is possible on your OS.

Key Concepts

This solution makes use of 2 key concepts:

  1. The Linux kernel supports multiple routing tables (http://linux-ip.net/html/routing-tables.html).
  2. IP packets can be easily marked with a unique marker, and routed to a specific routing table based on that marker.

Implementation

This implementation is based on creating a dedicated user that will be used for running your torrent software. Then we use iptables to mark all packets originating from that user with our special marker that will route the traffic to our special routing table that will send all traffic through the VPN. That way all other users remain unaffected.

In my case I decided to use NordVPN (https://nordvpn.com). Any other VPN provider will work, as long as it is possible for you to connect using the amazing OpenVPN software (https://openvpn.net/).

So the first step is to make sure that you can connect to your VPN with OpenVPN. The instructions for NordVPN are found here: https://nordvpn.com/tutorials/linux/openvpn/

After you have that working, proceed to the next step.

Preparation

First, we need to comment out any authentication options specified in the OpenVPN config file you downloaded from your VPN provider. In my case, I had to comment out the ‘auth-user-pass‘ directive, because I didn’t want OpenVPN to ask me for my credentials every time. I want the connection to authenticate automatically, so I opened the config file for my selected server and commented out the line:

/etc/openvpn/ovpn_tcp/ca306.nordvpn.com.tcp.ovpn:

#auth-user-pass

We’ll specify a different way to authenticate later.

Next, we need to change a couple of kernel parameters so that we can route the packets the way we want. We’ll need to edit /etc/sysctl.conf and add the following lines:

net.ipv4.ip_forward = 1             # Enable IP Forwarding
net.ipv4.conf.default.rp_filter = 0 # Disable Source Route Path Filtering
net.ipv4.conf.all.rp_filter = 0     # Disable Source Route Path Filtering on All interfaces

and then run:

sudo sysctl -p /etc/sysctl.conf

to activate your new settings.

Next, create a user just for your torrent program. You’ll also want to make sure that your torrent program is always started by this user. The reason for this is that iptables has an “owner” packet matching plugin which matches all outgoing packets belonging to a specific UID. You can use this to put a mark on all packets belonging to that user which can be used by the kernel to route those packets through a specific interface.

In this guide we’ll assume that the user is called ‘torrents.

Startup Scripts

You are now ready to copy-and-paste some startup scripts that will set everything up for you when your computer boots.

/etc/openvpn/nord_vpn_start.sh

openvpn \
    --log-append  /var/log/openvpn/nordvpn-client.log \
    --route-noexec \
    --script-security 2 \
    --up-delay \
    --up /etc/openvpn/nord_vpn_callback_up.sh \
    --auth-user-pass /etc/openvpn/nord_vpn_auth.txt \
    --config /etc/openvpn/ovpn_tcp/ca306.nordvpn.com.tcp.ovpn

Note: The last line is where you specify the OpenVPN config file for the specific VPN server you wish to use.

/etc/openvpn/nord_vpn_common_setup.sh

#!/bin/sh

# User defined config
#
export USER_NAME='torrents'        # VPN will be enabled only for this user
export PACKET_MARKER=3             # Arbitrary packet marker<span id="mce_SELREST_start" style="overflow:hidden;line-height:0;"></span>
export ROUTING_TABLE_NUMBER=200    # Arbitrary routing table number

# These enviroment variables are set by OpenVPN.
# See manpage 'Environmental Variables' section.
#
export TUN_DEV=$dev
export VPN_LOCAL_IP=$ifconfig_local
export VPN_GATEWAY_IP=$route_vpn_gateway

/etc/openvpn/nord_vpn_callback_up.sh

#!/bin/sh

. /etc/openvpn/nord_vpn_common_setup.sh

echo "================================================"
echo "       --- Hooking up to Nord VPN ---"
echo "================================================"
echo "VPN Interface: $TUN_DEV"
echo "VPN Local IP: $VPN_LOCAL_IP"
echo "VPN Gateway IP: $VPN_GATEWAY_IP"
echo

if [ -z "$VPN_GATEWAY_IP" ] ; then
    echo "ERROR: Not all expected parameters were present!\n"
    exit 1
fi

# Just in case we didn't clean up before.
echo "\nCleaning up from previous run..."
ip rule delete fwmark $PACKET_MARKER
ip route flush table $ROUTING_TABLE_NUMBER

# Attach a marker to all packets coming from processes owned by the user
echo "\nInserting iptables rules..."
iptables -t mangle -A OUTPUT -m owner --uid-owner $USER_NAME -j MARK --set-mark $PACKET_MARKER

# Everything that leaves over the VPN's TUN device should have the source address set currectly.
# Apparently some torrent clients mistakenly grab the address from eth0 instead, which makes
# the VPN drop those packets. This corrects any such packets with bad source address.
iptables -t nat -A POSTROUTING -o $TUN_DEV -j SNAT --to-source $VPN_LOCAL_IP

echo "\nMANGLE OUTPUT:"
iptables -t mangle -L OUTPUT

echo "\nNAT POSTROUTING:"
iptables -t nat -L POSTROUTING

# Everything that is marked with $PACKET_MARKER should be routed to our custom routing table
echo "\nForwading all packets marked with $PACKET_MARKER to the new routing table $ROUTING_TABLE_NUMBER...."
ip rule add fwmark $PACKET_MARKER lookup $ROUTING_TABLE_NUMBER
ip rule

# All traffic destined for the LAN should go over eth0, not the VPN
echo "\nRouting LAN packets to eth0..."
ip route add 192.168.0.0/24 dev eth0 table $ROUTING_TABLE_NUMBER

# Everything else should be routed via the VPN device
echo "\nRouting all external traffic to the VPN Gateway $VPN_GATEWAY_IP..."
ip route add default via $VPN_GATEWAY_IP dev $TUN_DEV table $ROUTING_TABLE_NUMBER 

if [ $? -ne 0 ]; then
    echo "ERROR: Could not add default route $VPN_GATEWAY_IP!\n"
    exit 2
fi

# Show the new routing table
ip route list table $ROUTING_TABLE_NUMBER

echo
echo "\nVPN is connected!\n"
ifconfig $TUN_DEV
echo

/etc/openvpn/nord_vpn_auth.txt

Your Username
Your Password

/etc/openvpn/nord_vpn_down.sh

#!/bin/sh

. /etc/openvpn/nord_vpn_common_setup.sh

echo "================================================"
echo "       --- Cleaning up after Nord VPN ---"
echo "================================================"
echo

echo "Removing iptables rules..."
iptables -t mangle -D OUTPUT -m owner --uid-owner $USER_NAME -j MARK --set-mark $PACKET_MARKER
iptables -t nat -D POSTROUTING -o $TUN_DEV -j SNAT --to-source $VPN_LOCAL_IP

echo "\nMANGLE OUTPUT:"
iptables -t mangle -L OUTPUT

echo "\nNAT POSTROUTING:"
iptables -t nat -L POSTROUTING

echo "\nRemoving custom routing table $ROUTING_TABLE_NUMBER...\n"
ip rule delete fwmark $PACKET_MARKER
ip route flush table $ROUTING_TABLE_NUMBER

ip route
echo
ip rule
echo

NOTE: This script is provided for your convenience when you wish to shut down the VPN manually for some reason. We are purposefully not attaching it to OpenVPN’s down-hook. This provides us with our own “kill switch” functionality. If the VPN goes down for whatever reason, your torrents will stop working, rather than smoothly transitioning to non-encrypted downloads without telling you.

/etc/rc.local

echo "Starting NordVPN..."
/etc/openvpn/nord_vpn_start.sh &

exit 0

The above is one of many ways to start your VPN at boot.

And that’s it. Hope it helps.

Sources

Everything in this guide is based on the following Reddit post. All I did here is provide the actual scripts to make the setup easier.

JPA callbacks with Hibernate’s SessionFactory and no EntityManager

I wanted to use JPA callback annotations, such as @PostLoad
and @PostUpdate, but realized that those JPA annotations do not work, unless Hibernate is configured to use a JPA EnityManager. My project uses Hibernate’s SessionFactory, so these annotations are not available to me out of the box.

So, how do we configure Hibernate to get the best of both worlds? Here’s how I did it in Hibernate 5. Hibernate 4 can use a very similar approach, but the code would be slightly different (just grab it from org.hibernate.jpa.event.spi.JpaIntegrator)

Luckily, Hibernate’s IntegratorServiceImpl uses the java.util.ServiceLoader API, so we can specify an additional list of org.hibernate.integrator.spi.Integrator implementations we want the SessionFactory to use.

All we need to do is specify a service provider for org.hibernate.integrator.spi.Integrator in:

META-INF/services/org.hibernate.integrator.spi.Integrator:

# This allows us to use JPA-style annotation on entities, such as @PostLoad
our.custom.JpaAnnotationsIntegrator

You will also need to ensure that ‘hibernate-entitymanager‘ jar of the appropriate version is on your classpath.

our.custom.JpaAnnotationsIntegrator (taken from org.hibernate.jpa.event.spi.JpaIntegrator):

package our.custom;

import org.hibernate.annotations.common.reflection.ReflectionManager;
import org.hibernate.boot.Metadata;
import org.hibernate.boot.internal.MetadataImpl;
import org.hibernate.engine.spi.SessionFactoryImplementor;
import org.hibernate.event.service.spi.EventListenerRegistry;
import org.hibernate.event.spi.EventType;
import org.hibernate.integrator.spi.Integrator;
import org.hibernate.jpa.event.internal.core.JpaPostDeleteEventListener;
import org.hibernate.jpa.event.internal.core.JpaPostInsertEventListener;
import org.hibernate.jpa.event.internal.core.JpaPostLoadEventListener;
import org.hibernate.jpa.event.internal.core.JpaPostUpdateEventListener;
import org.hibernate.jpa.event.internal.jpa.CallbackBuilderLegacyImpl;
import org.hibernate.jpa.event.internal.jpa.CallbackRegistryImpl;
import org.hibernate.jpa.event.spi.jpa.CallbackBuilder;
import org.hibernate.jpa.event.spi.jpa.ListenerFactory;
import org.hibernate.jpa.event.spi.jpa.ListenerFactoryBuilder;
import org.hibernate.mapping.PersistentClass;
import org.hibernate.service.spi.SessionFactoryServiceRegistry;

/**
 * This integrator allows us to use JPA-style post op annotations on Hibernate entities.
 *

 * This integrator is loaded by <code>org.hibernate.integrator.internal.IntegratorServiceImpl</code> from
 * <code>META-INF/services/org.hibernate.integrator.spi.Integrator</code> file.
 *

 * <b>Note</b>: This code is lifted directly from <code>org.hibernate.jpa.event.spi.JpaIntegrator</code>
 *
 * @author Val Blant
 */
public class JpaAnnotationsIntegrator implements Integrator {
	private ListenerFactory jpaListenerFactory;
	private CallbackBuilder callbackBuilder;
	private CallbackRegistryImpl callbackRegistry;

	@Override
	public void integrate(Metadata metadata, SessionFactoryImplementor sessionFactory, SessionFactoryServiceRegistry serviceRegistry) {
		final EventListenerRegistry eventListenerRegistry = serviceRegistry.getService( EventListenerRegistry.class );

		this.callbackRegistry = new CallbackRegistryImpl();

		// post op listeners
		eventListenerRegistry.prependListeners( EventType.POST_DELETE, new JpaPostDeleteEventListener(callbackRegistry) );
		eventListenerRegistry.prependListeners( EventType.POST_INSERT, new JpaPostInsertEventListener(callbackRegistry) );
		eventListenerRegistry.prependListeners( EventType.POST_LOAD, new JpaPostLoadEventListener(callbackRegistry) );
		eventListenerRegistry.prependListeners( EventType.POST_UPDATE, new JpaPostUpdateEventListener(callbackRegistry) );

		// handle JPA "entity listener classes"...
		final ReflectionManager reflectionManager = ( (MetadataImpl) metadata )
				.getMetadataBuildingOptions()
				.getReflectionManager();

		this.jpaListenerFactory = ListenerFactoryBuilder.buildListenerFactory( sessionFactory.getSessionFactoryOptions() );
		this.callbackBuilder = new CallbackBuilderLegacyImpl( jpaListenerFactory, reflectionManager );
		for ( PersistentClass persistentClass : metadata.getEntityBindings() ) {
			if ( persistentClass.getClassName() == null ) {
				// we can have non java class persisted by hibernate
				continue;
			}
			callbackBuilder.buildCallbacksForEntity( persistentClass.getClassName(), callbackRegistry );
		}
	}

	@Override
	public void disintegrate(SessionFactoryImplementor sessionFactory, SessionFactoryServiceRegistry serviceRegistry) {
		if ( callbackRegistry != null ) {
			callbackRegistry.release();
		}
		if ( callbackBuilder != null ) {
			callbackBuilder.release();
		}
		if ( jpaListenerFactory != null ) {
			jpaListenerFactory.release();
		}
	}

}