This article will discuss creation of H.264 videos from Cinelerra on Ubuntu 12.04. A lot of the information was synthesized from
Olson Video and Websites.
Built-in H.264 Export
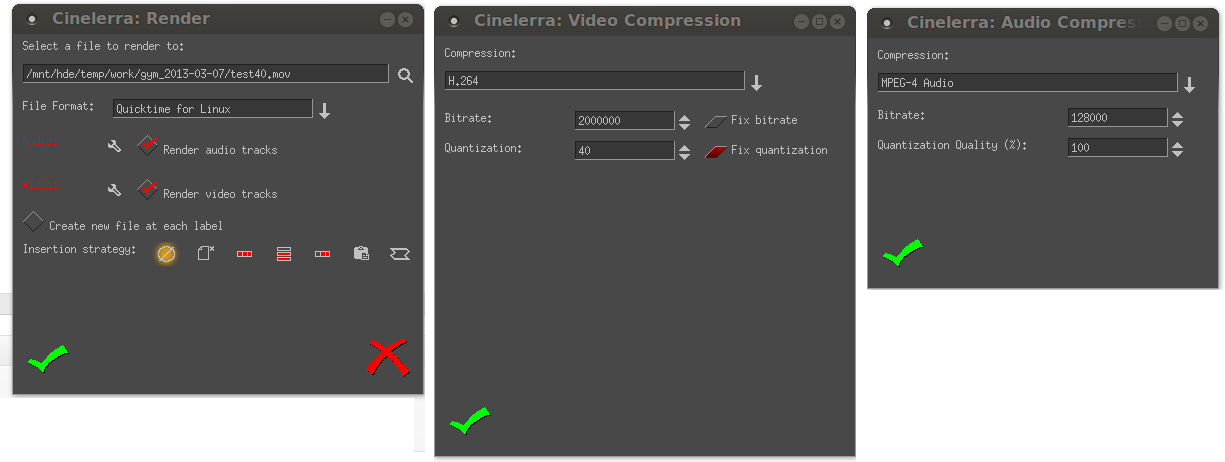
In the Renderer select “Quicktime for Linux”, and then use the H.264 compression option for video, and MPEG-4 Audio for sound:

The problem with this approach is that Cinelerra provides very few settings to customize the encoding. I can achieve a much higher quality for the same size by using 2-pass encoding with the x264 utility. Luckily for us, Cinelerra has YUV4MPEG Stream option.
YUV4MPEG Stream
YUV4MPEG Stream allows us to pipe the video stream out of Cinelerra into an arbitrary tool chain. In this case the tool chain is my script that uses named pipes to encode the video with x264.
The script was adopted from here: http://www.renomath.org/ejolson/video/hddvd/264wf.html
I used http://www.renomath.org/ejolson/video/hddvd/pipe-x264 as a starting point.
Preparation
- Make sure that you have the x264 package installed.
- Save the code provided in the last section of this post as /usr/local/bin/pipe-x264.sh
- Make /usr/local/bin/pipe-x264.sh executable.
- Specify the desired resolution and FPS in the script. See code in the last section, which shows you which lines to modify.
- Cinelerra must be launched from the command line, so that you can see the console output.
Export Steps
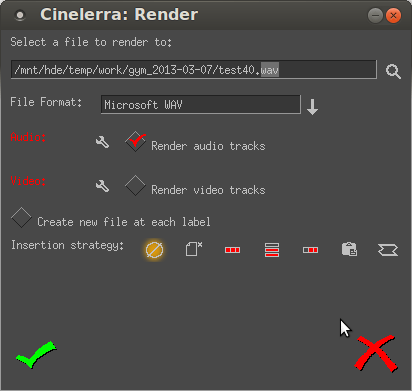
1) Export The Sound
In the Renderer select “Microsoft WAV” for File Format, check Audio and uncheck Video. Export.
2) First Pass Video
In the Renderer select “YUV4MPEG Stream” for File Format, check Video and uncheck Audio. In the settings check “Use Pipe” and type the following:
$ /usr/local/bin/pipe-x264.sh -p 1 -b 1000 "%"
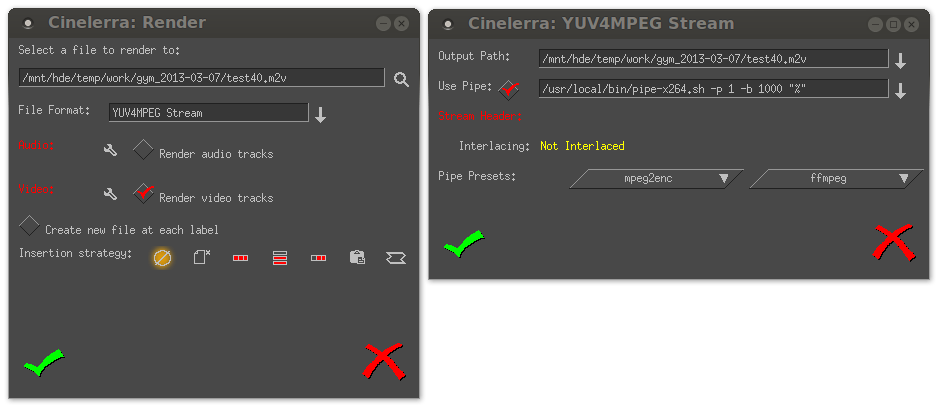
The first parameter (-p) is the pass number. The second (-b) is the bitrate you want. Make sure that the path points to where you’ve saved the script, that I’ll give you below.
If all works well, the video should start encoding. To check if it is actually working, you must launch Cinelerra from the command line and look at the console output after you start rendering. You should see x264 command call printed and x264 should be running and printing stuff to the console. If something went wrong, you’ll see an error instead. If you can’t figure out what’s wrong from the output, leave a comment and I might try to help.
The output in the console should look something like this:
Running pass 1:
     x264 /tmp/cine_pipe --input-res 1920x1080 --fps 59.9401 --bitrate 1000     --pass 1 --stats "/mnt/hde/temp/work/gym_2013-03-07/test40.stats"     --bframes 2 --b-adapt 2     --direct auto     --threads auto     --output "/mnt/hde/temp/work/gym_2013-03-07/test40.m2v"

[yuv4mpegpipe @ 0x15ae720] Estimating duration from bitrate, this may be inaccurate
lavf [info]: 1920x1080p 0:1 @ 60000/1001 fps (cfr)
x264 [info]: using cpu capabilities: MMX2 SSE2Fast SSSE3 FastShuffle SSE4.2
x264 [info]: profile Main, level 4.2
Render::render_single: Session finished.
x264 [info]: frame I:1     Avg QP:43.42  size: 10362
x264 [info]: frame P:49    Avg QP:39.33  size:  3682
x264 [info]: frame B:95    Avg QP:41.30  size:   788
x264 [info]: consecutive B-frames:  0.7%  4.1% 95.2%
x264 [info]: mb I  I16..4: 97.9%  0.0%  2.1%
x264 [info]: mb P  I16..4: 11.4%  0.0%  0.0%  P16..4:  9.3%  0.0%  0.0%  0.0%  0.0%    skip:79.2%
x264 [info]: mb B  I16..4:  0.7%  0.0%  0.0%  B16..8:  2.8%  0.0%  0.0%  direct: 1.0%  skip:95.6%  L0:39.7% L1:59.7% BI: 0.6%
x264 [info]: final ratefactor: 34.33
x264 [info]: direct mvs  spatial:88.4% temporal:11.6%
x264 [info]: coded y,uvDC,uvAC intra: 1.7% 25.6% 1.4% inter: 0.2% 1.5% 0.0%
x264 [info]: i16 v,h,dc,p: 46% 31% 16%  7%
x264 [info]: i4 v,h,dc,ddl,ddr,vr,hd,vl,hu: 16% 25% 36%  2%  3%  6% 10%  2%  1%
x264 [info]: i8c dc,h,v,p: 76% 12% 11%  2%
x264 [info]: Weighted P-Frames: Y:0.0% UV:0.0%
x264 [info]: kb/s:878.42
3) Second Pass Video
Once the first pass render is finished, go back to Video Settings in the Renderer and change the pipe command to run the second pass (-p 2):
$ /usr/local/bin/pipe-x264.sh -p 2 -b 1000 "%"
Again check the console to make sure that encoding has started.
4) Multiplex Video and Sound
The previous steps should have produced two files: test40.m2v and test40.wav. We need to multiplex them into a container:
$ ffmpeg -i test40.m2v -i test40.wav -acodec libmp3lame -ab 128k -ar 48000 -vcodec copy test40.avi
Here is a handy script to keep around for this step:
#!/bin/bash
# Multiplex video and sound
#

if [[ $# -lt 2 ]] ; then
    echo
    echo "  Usage: $0 <video file> <sound file>"
    echo
    exit 1
fi

command="ffmpeg -i $1 -i $2 -acodec libmp3lame -ab 128k -ar 48000 -vcodec copy ${1%%.*}.avi"

echo $command
eval $command
Mission Accomplished
You should now have a nice H.264 avi file.
Note that the .m2v file will probably not play correctly in any player, but that is ok, b/c after we multiplex it with sound the resulting file plays everywhere.
pipe-x264.sh
Please note that you have to set the desired resolution and framerate on the lines highlighted below.
#!/bin/bash
#
# Use this script to export H.264 videos from Cinelerra
#

# Change these to suite your needs
######## Canon G6 ##############
#frame_rate=10
#resolution=640x480
######## Sony A57 ##############
frame_rate=59.9401
resolution=1920x1080

pass=1
bit_rate=10000

help(){
    cat <<END
Usage: $0 [options] filename.anything
Options:
    -b n      bitrate n                             ($bit_rate)
    -p n      pass n                                ($pass)
    -h        Print this help message
END
    exit 0
}

while getopts b:p:h name "$@"
do
    case $name in
b)
	bit_rate=$OPTARG ;;
p)
	pass=$OPTARG ;;
*)
    help ;;
    esac
done
let shiftind=$OPTIND-1
shift $shiftind
if test "$#" != "1"
then
    help
fi

outfile=$1
base=`echo $outfile | sed "s/\.[^.]*$//"`

command="x264 /tmp/cine_pipe --input-res $resolution --fps $frame_rate --bitrate $bit_rate \
    --pass $pass --stats \"$base.stats\" \
    --bframes 2 --b-adapt 2 \
    --direct auto \
    --threads auto \
    --output \"$outfile\""

# Make a named pipe
rm /tmp/cine_pipe 2> /dev/null
mkfifo /tmp/cine_pipe

echo "Running pass $pass:"
echo "     $command"
echo

# Run the encoding command. It will block and wait for cat to start feeding data into the pipe
eval "$command &"

cat > /tmp/cine_pipe
Hope this helps.